Your restaurant. One connected team. Let’s get started.
A plain-English guide to what Resay does, who uses each app, and how to run your first service.
Beginner friendlyStep-by-step workflows8 October 2026
CHAPTER 01
Start here
Resay helps a restaurant take orders, collect payments, prepare food, and keep track of daily work.
New: 35 real app screenshots. Follow the pictures and numbered steps in each chapter. Yellow number markers are guide annotations; they are not part of the app. Click a picture for a full-size view. All screenshots use local demonstration data. Names, prices, taxes, stock, and order numbers are examples. Placeholder food images are part of this demo.
The kiosk, cashier, and kitchen captures use browser builds of the same Flutter apps. Device layout, themes, and hardware controls may vary. Physical printers and card readers were not exercised.
Think of it as a shared order book. Customers, cashiers, and kitchen staff use different screens, but work with the same restaurant information. Managers maintain the menu and review operations from a web dashboard.
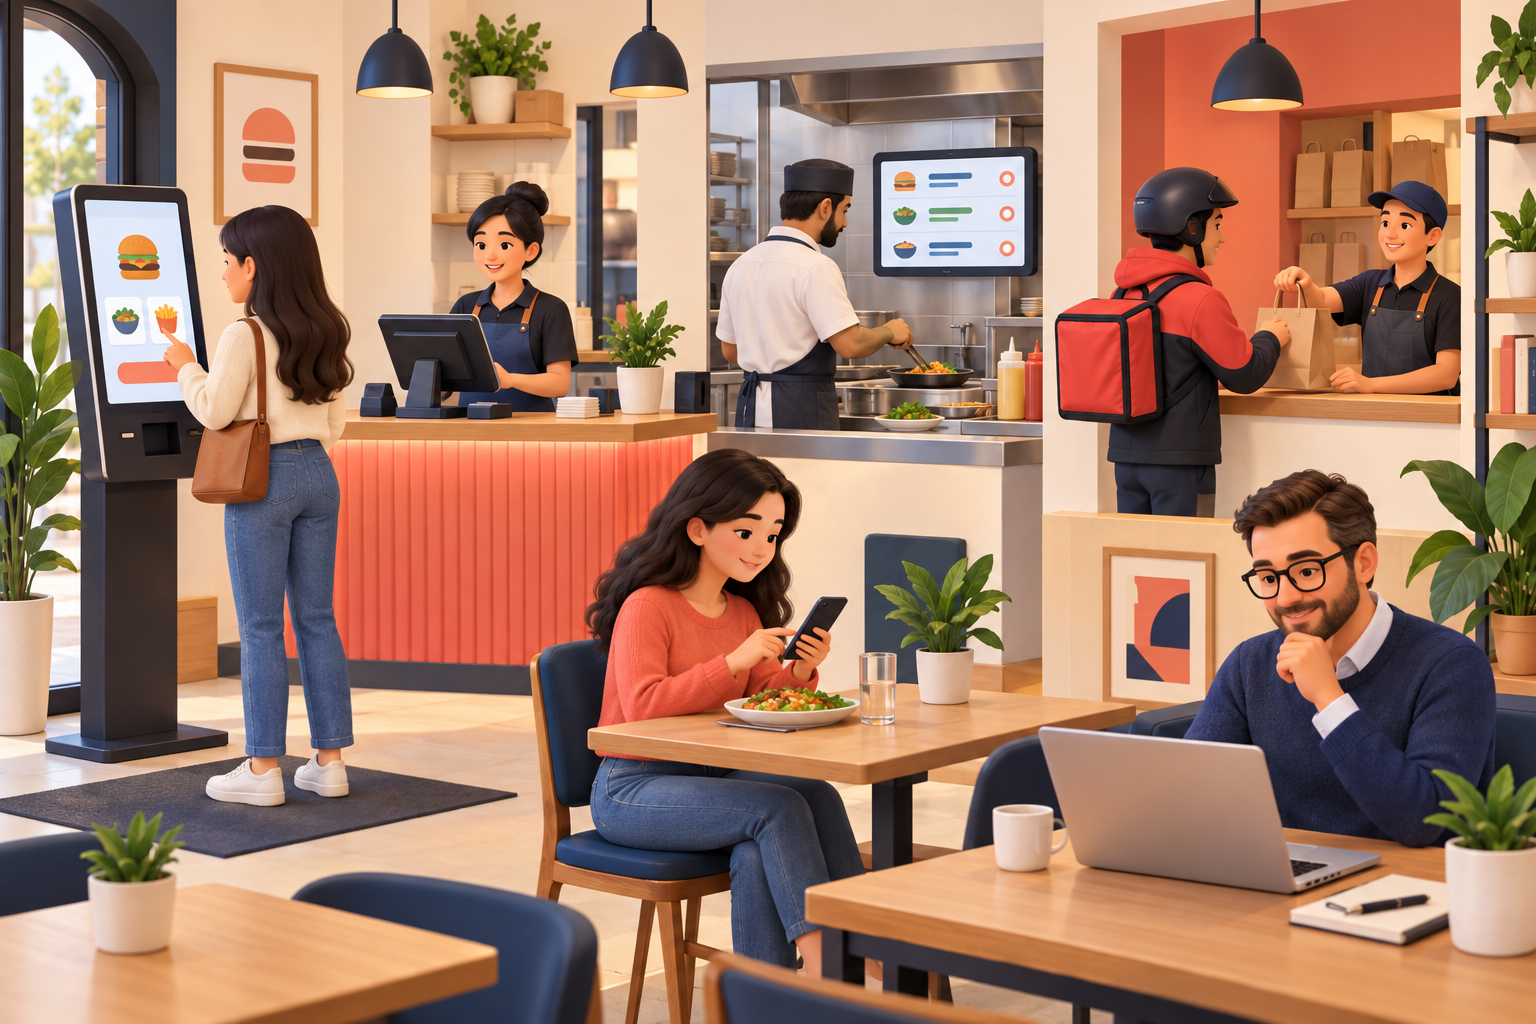
AI-generated concept illustration. Device screens and people illustrate roles; this is not an app screenshot.
Menu, branches, staff, devices, orders, stock, reports, and settings.
Kiosk
Customer inside the restaurant
Browse food, choose extras, review the basket, and follow checkout.
Cashier / POS
Counter staff
Create sales, handle orders and payments, print receipts, and manage shifts.
Chef / KDS
Kitchen team
Read tickets, start cooking, and mark food ready.
Status display
Customers waiting for food
See order numbers being prepared or ready for collection.
Online portal
Customer on a phone or computer
Order through a restaurant link or QR code and view order progress.
Delivery
Dispatcher / delivery team
Assign riders; the current rider screen provides manual location updates.
Super Admin
Platform administrator
Manage companies, branches, users, Lite accounts, and platform payment providers.
CHAPTER 03
Follow one order
Example: a guest orders one burger with extra cheese for takeaway.
1 · ChooseKiosk, cashier, or phone
2 · ConfirmItems, extras, total
3 · PrepareKitchen reads the ticket
4 · ReadyFood can be collected
5 · HandoverServe or dispatch
The order number connects these steps. Staff should use that number when checking a payment, finding a kitchen ticket, or handing over food.
Word on screen
Plain-language meaning
Pending / incoming
The order has been received and is waiting for the next action.
Preparing / cooking
The kitchen has started making the food.
Ready
Food is ready for collection or the next handover step.
Served / completed
The order has reached its completion step in that workflow.
Cancelled
The order was stopped. Check payment separately if money was collected.
Paid / unpaid / refunded
Money status; separate from cooking or delivery progress.
CHAPTER 04
First-time restaurant setup
For the owner or manager. Complete this before serving real customers.
Follow the actual screens
REAL APP SCREEN · LOCAL DEMO
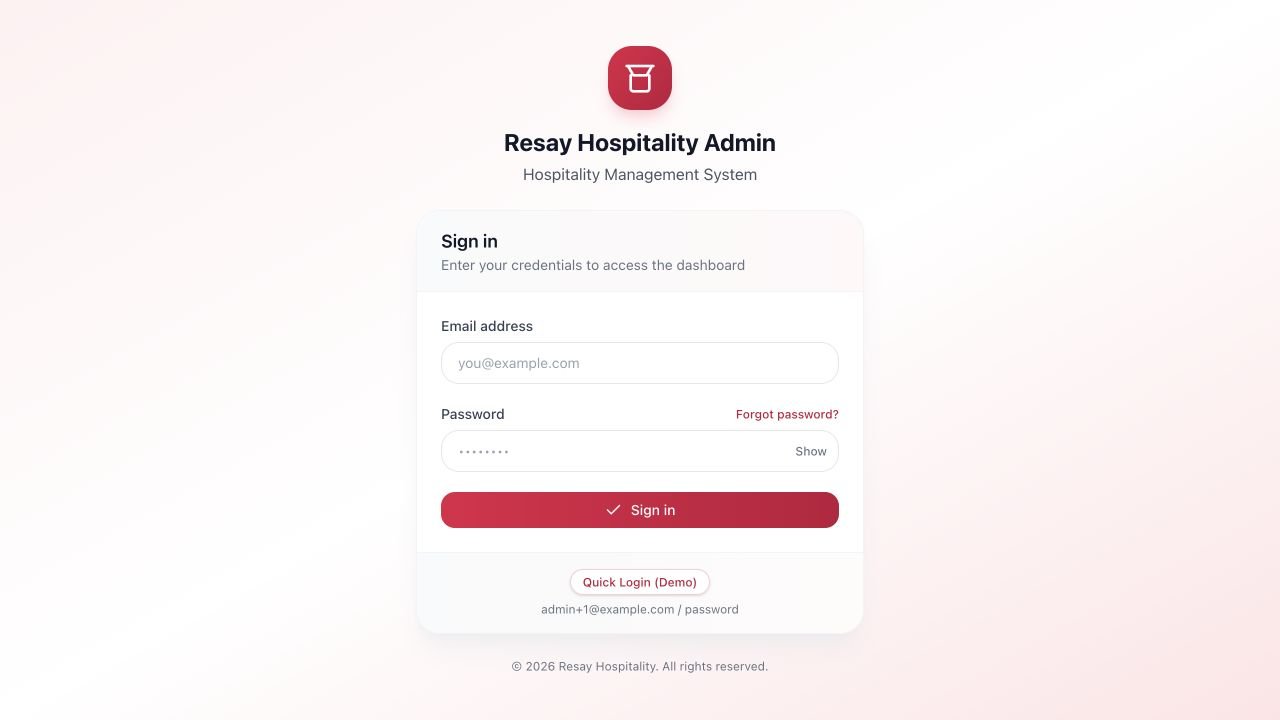
Sign in to the management dashboard
Where: Admin web address → Sign in
Click or tap the picture to open the original full-size screenshot. Use your browser’s Back button or close the image tab to return.
Enter the work email assigned by your administrator.
Enter your password, then select Sign in. Use Forgot password? only if you need account recovery.
After signing in, confirm the restaurant or branch you are working in. The demo shortcut pictured is for testing; use your own assigned account.
What you should see: The dashboard opens for your account.
REAL APP SCREEN · LOCAL DEMO
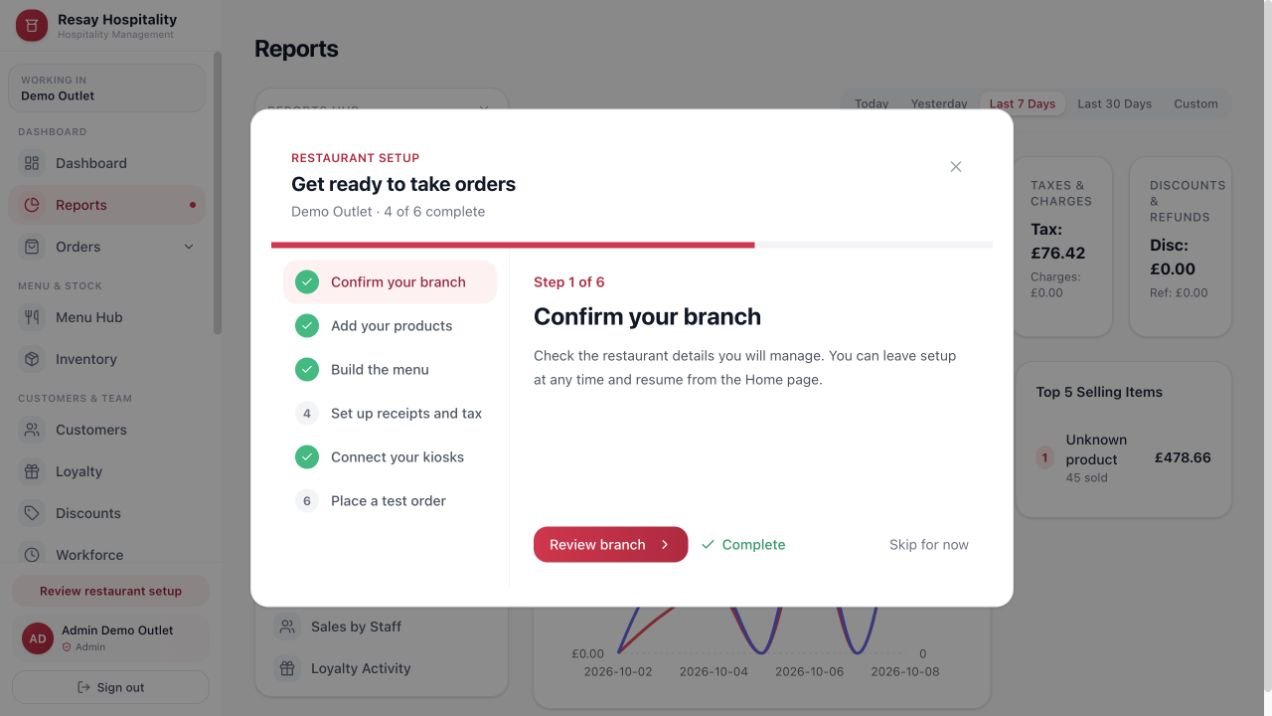
Follow the restaurant setup checklist
Where: Admin → Review restaurant setup
Click or tap the picture to open the original full-size screenshot. Use your browser’s Back button or close the image tab to return.
Select a setup task in the list on the left. Start with Confirm your branch.
Use the action in the right panel to open the relevant page, then finish the actual setup there.
Return to the checklist and mark the task done only after checking it. Close setup if you need to return to the dashboard.
What you should see: The checklist shows what still needs attention; a completed check is not a hardware or payment test.
Get access. Open the assigned Admin dashboard URL and sign in. Ask your account administrator for access if you cannot sign in.
Select the right branch. A branch (also called an outlet) is one restaurant location. Check the branch selector before changing menus, devices, stock, or tables. An “All Branches” view can show combined information.
Review the restaurant. Use Branches to inspect the location you will operate. Ask the administrator to create or correct it if needed.
Build a small menu first. Add one category and one item in Menu Hub. Check its price and availability, then use Preview. Expand the menu after this works.
Set business options. An admin should review Currency, Taxes, Receipts, Appearance, and Integrations. Use your restaurant’s agreed settings.
Prepare staff. Open Workforce to configure the team and access needed for their jobs. Cashier onboarding also uses a staff passcode/PIN.
Prepare devices. Pair cashier terminals in POS Setup; manage kiosk and status-display pairing in Kiosk Setup. Set up the kitchen branch and printer.
Prepare tables or phone ordering. Use Floor & Tables for the floor plan, tables, and QR code. Test the actual restaurant link.
Rehearse one complete order. Use an approved training environment or a manager-approved test transaction. Confirm the ticket appears, the kitchen can update it, the payment is correctly recorded, and the receipt is readable.
CHAPTER 05
Build and maintain the menu
Menu Hub brings the main menu tools into one place.
Follow the actual screens
REAL APP SCREEN · LOCAL DEMO
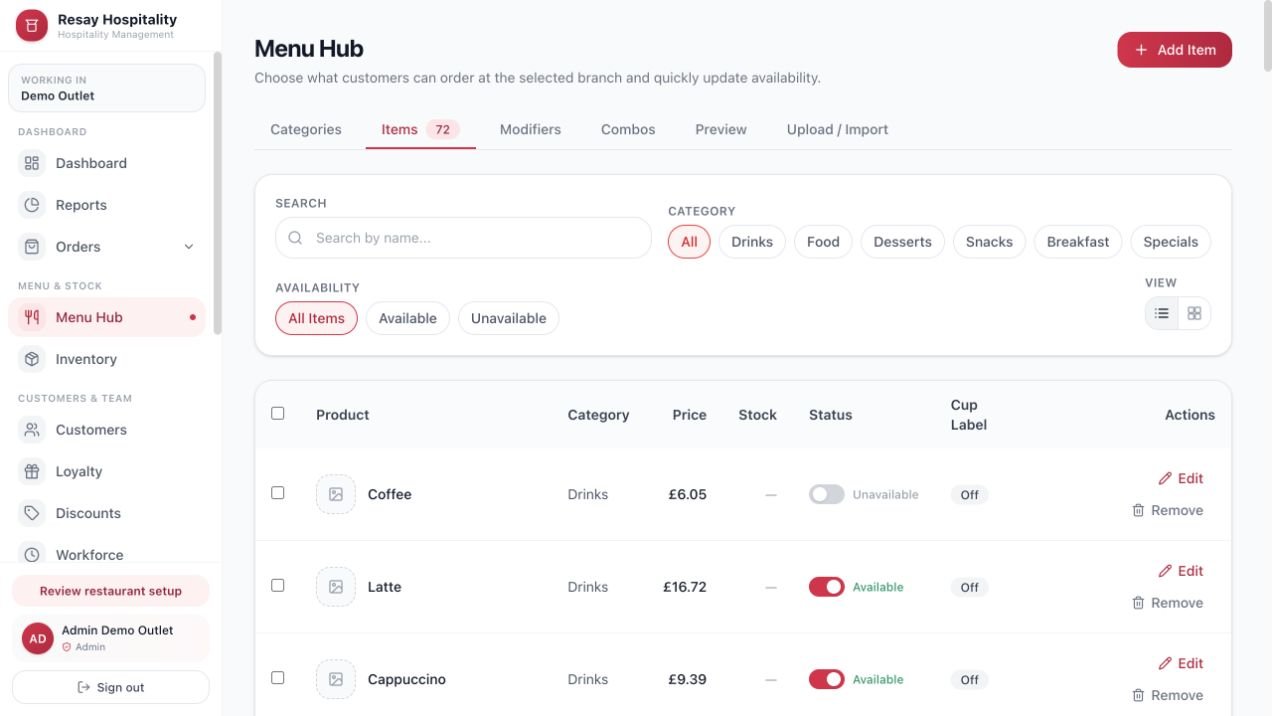
Find, edit, or add a menu item
Where: Admin → Menu Hub → Items
123Click or tap the picture to open the original full-size screenshot. Use your browser’s Back button or close the image tab to return.
Check the branch name at the upper left. Use the tabs to switch between Categories, Items, Modifiers, Combos, and Preview.
Select Add Item at the upper right to begin creating an item.
For an existing item, use Search, then its Edit action. The Status switch controls whether the item is available.
What you should see: You can identify the exact item and branch before changing anything.
REAL APP SCREEN · LOCAL DEMO
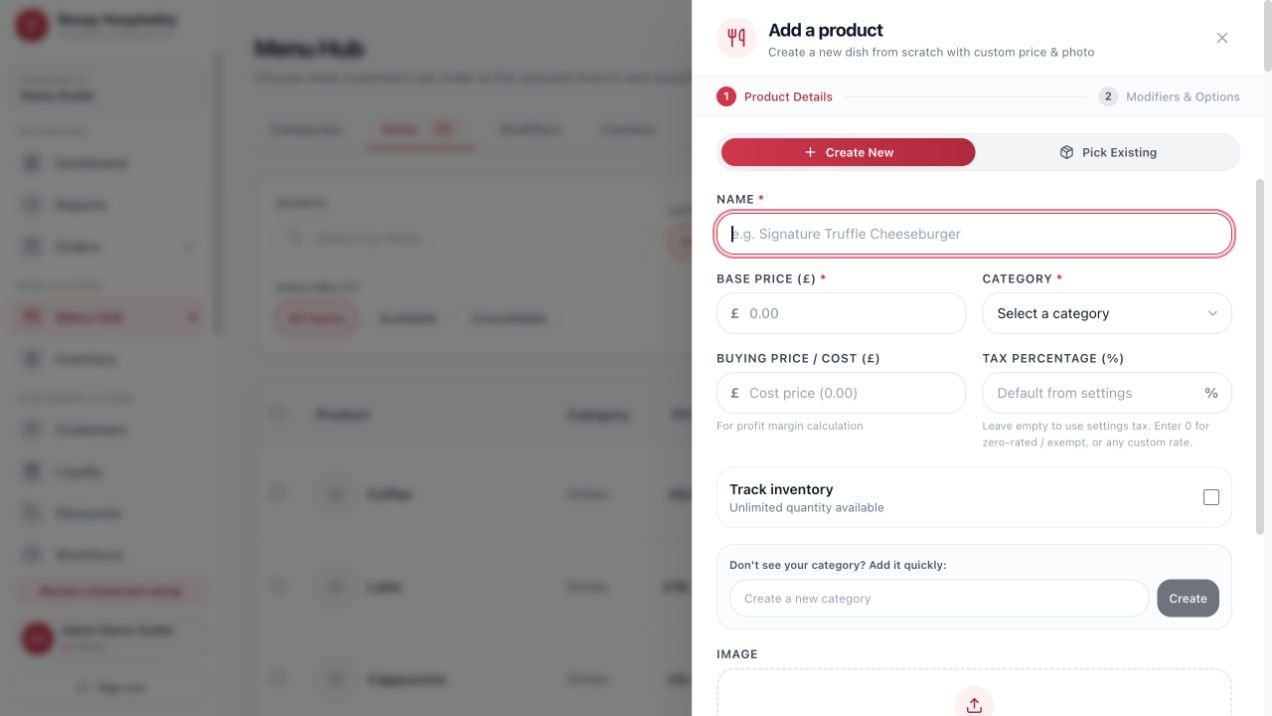
Fill in the product details
Where: Menu Hub → Add Item → Create New
123Click or tap the picture to open the original full-size screenshot. Use your browser’s Back button or close the image tab to return.
Type the product Name. Use a clear name a customer will recognize.
Enter Base Price and choose Category. Review cost, tax, inventory tracking, image, and description as needed.
Scroll down to Create & Continue to move to Modifiers & Options. Follow the remaining save steps, then check the result in Preview. Pick Existing is for adding a product already in the catalog.
What you should see: Required fields are filled and the product is assigned to the correct category.
Simplified reference strip based on current tab labels; not a screenshot.
Categories → create your groups. For example: Burgers, Sides, and Drinks. Categories help customers find food.
Items → Add Item. Select one branch first if you are viewing all branches. Enter the item details, assign a category, set its price, and review the available options in the editor. Save the item.
Review availability and order-type pricing. Make sure the item is offered at this branch. Where separate dine-in or takeaway prices are used, check each one.
Modifiers → create reusable choices. For example, “Choose a sauce” with BBQ or mayo, or an optional “Extra cheese”. Set selection limits and any extra charge, then attach the choices to the relevant item.
Combos → build a meal bundle if needed. Use existing items to define a fixed-price combination and the choices within it. Check all component items are appropriate.
Preview → check the customer menu. Read the name, photo, price, options, and final total as a customer would. Also check a real device before opening service.
Upload / Import → use only when ready. Use Download template for the import type in the app. Keep its column headers unchanged. Products create catalog records; Items assign existing products to a branch. Import referenced categories and products before dependent items or combos. Review import results and verify the affected items in Preview.
Category
A shelf: “Drinks”.
Item
A product on that shelf: “Iced tea”.
Modifier
A choice about it: “Less ice”.
Combo
A meal made from several items: burger + side + drink.
CHAPTER 06
Connect the devices
Pairing tells a device which restaurant branch it belongs to.
Follow the actual screens
REAL APP SCREEN · LOCAL DEMO
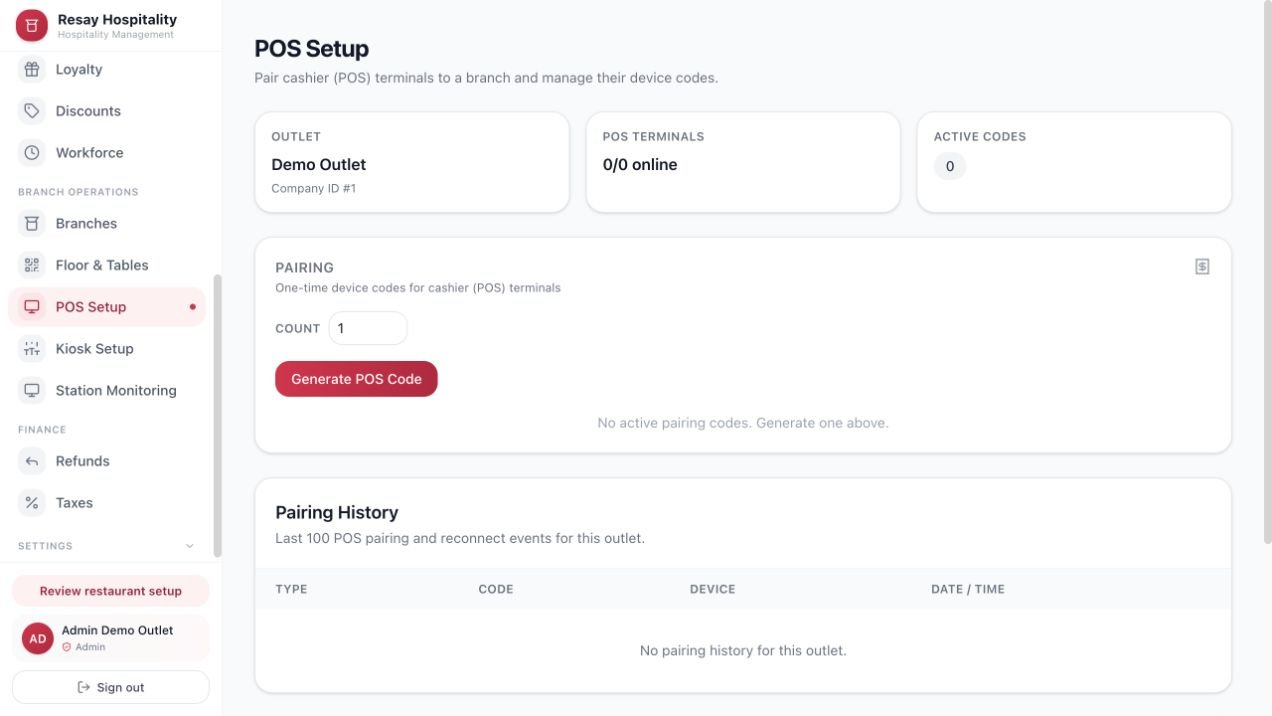
Get the cashier pairing code
Where: Admin → POS Setup
123Click or tap the picture to open the original full-size screenshot. Use your browser’s Back button or close the image tab to return.
Check the Outlet card. This is the restaurant the terminal will join.
Set Count to the number of codes needed, then choose Generate POS Code.
Enter the newly generated code on the cashier device. The screenshot shows the page before a code is generated.
What you should see: A cashier terminal can be linked to the correct branch.
Device
Where to begin
What to check
Cashier terminal
Admin → POS Setup → Generate POS Code
Correct branch and device code; then staff passcode and shift setup.
Kiosk
Admin → Kiosk Setup → pairing controls
Use the kiosk code/type shown for that branch.
Status display
Admin → Kiosk Setup → display/TV pairing controls
Use the matching display code/type, not a cashier code.
Kitchen
Chef app → Sign In → Select Branch → Printer Setup
Branch, printer connection, and a test print.
Generate the appropriate code in the correct branch. Follow the code’s displayed availability or validity information.
Enter it on the intended device. Complete any device-name or confirmation prompts.
Verify the branch and menu on the device; check its record in the setup or monitoring page.
If pairing fails, check the device type, connection, and whether the code has already been used or revoked. Ask the manager to generate or reconnect it through the appropriate setup screen.
CHAPTER 07
Customer walkthrough: kiosk
Use the self-service screen inside the restaurant.
Follow the actual screens
REAL APP SCREEN · LOCAL DEMO
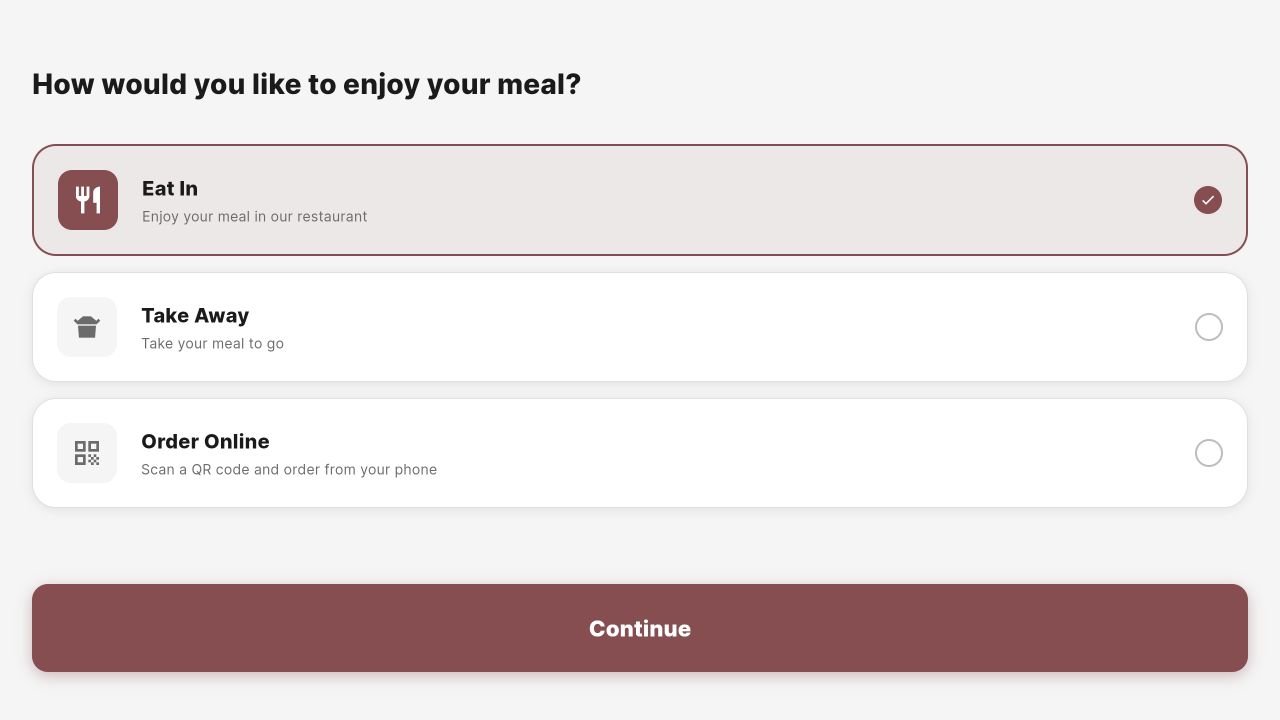
Choose how to receive the meal
Where: Kiosk → Start Order
123Click or tap the picture to open the original full-size screenshot. Use your browser’s Back button or close the image tab to return.
Choose Eat In for a restaurant table or Take Away for collection.
Order Online is the phone-ordering route when offered. For this kiosk example, choose Take Away.
Check the selected option, then tap Continue.
What you should see: The customer menu opens for the selected order type.
REAL APP SCREEN · LOCAL DEMO
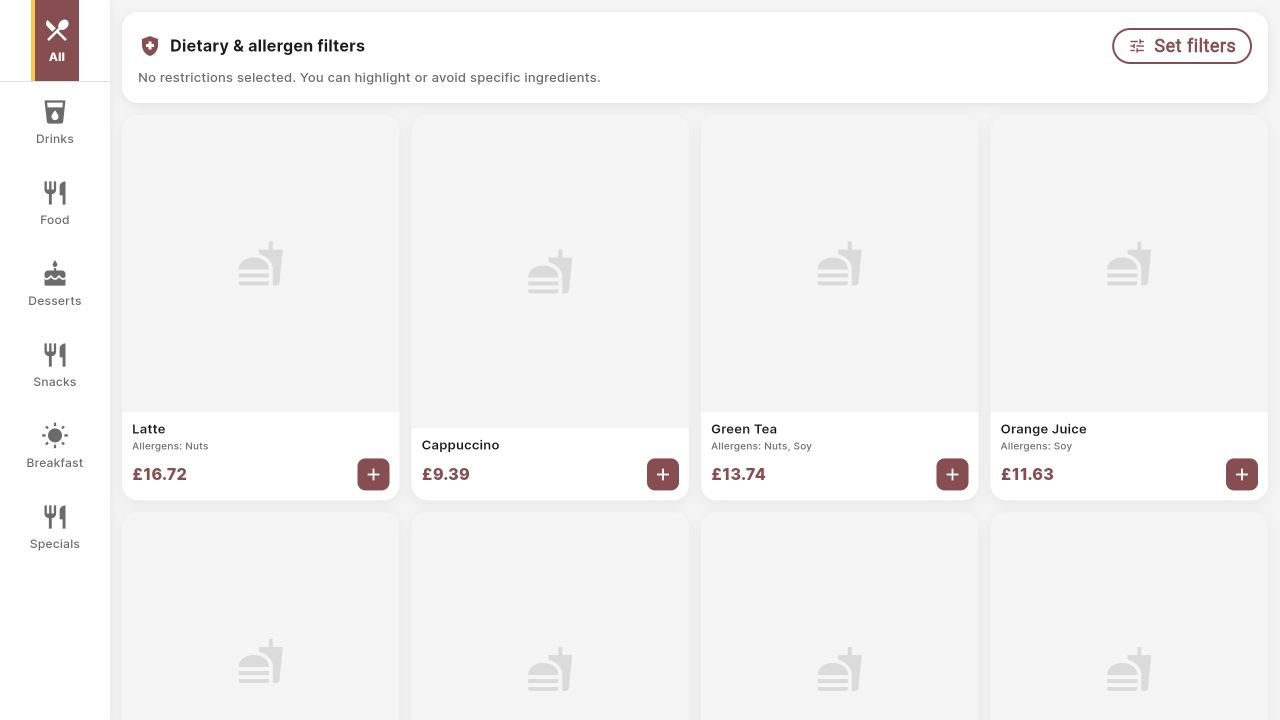
Browse and add food
Where: Kiosk → menu
123Click or tap the picture to open the original full-size screenshot. Use your browser’s Back button or close the image tab to return.
Use the category list on the left to find food or drinks.
Read the item name and price. Tap the item to view its details, or use its + button to add it where supported.
When an item has required choices, complete them. After adding an item, the order bar shows the quantity and total; use Place Order to review the basket.
What you should see: The item appears in the current order. Placeholder pictures are normal in this demo because no food photos were uploaded.
REAL APP SCREEN · LOCAL DEMO
Read details before adding
Where: Kiosk → tap an item
123Click or tap the picture to open the original full-size screenshot. Use your browser’s Back button or close the image tab to return.
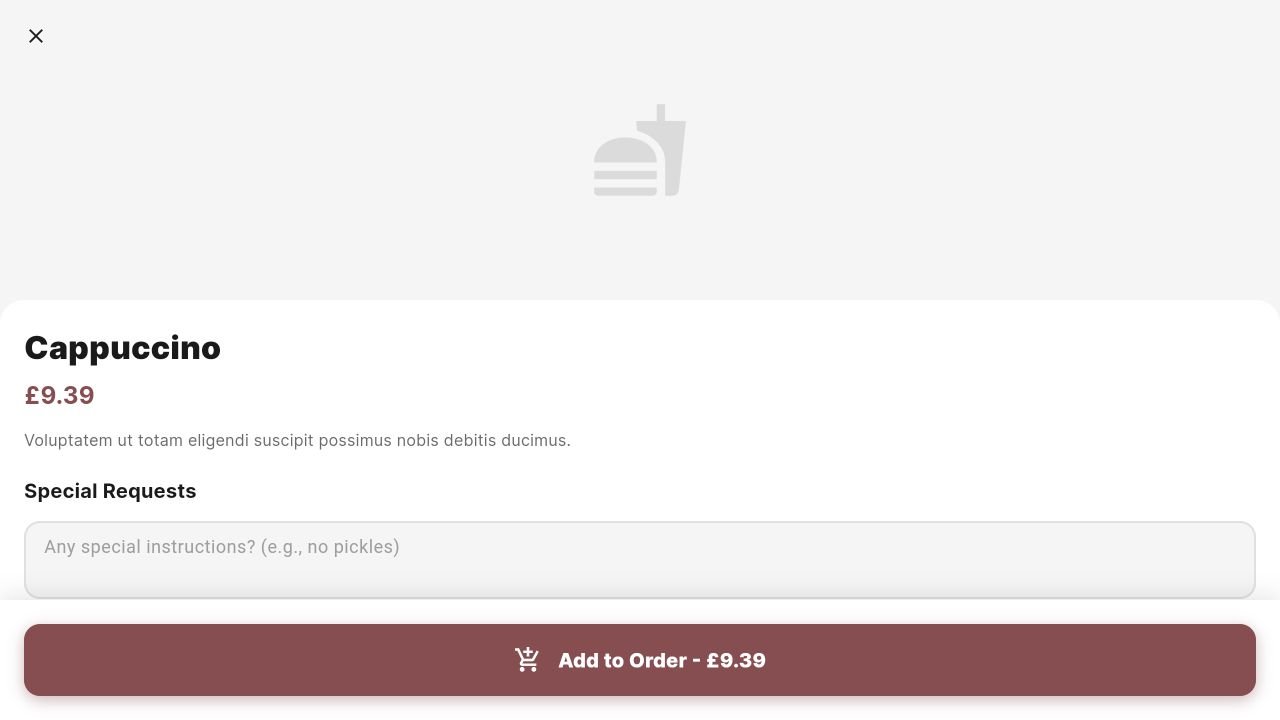
Check the name, price, and description. The screenshot shows Cappuccino as a separate item-details example.
Enter Special Requests if needed and complete any options displayed.
Tap Add to Order to add this item. Use the X to leave without adding.
What you should see: The item is added with the chosen details.
REAL APP SCREEN · LOCAL DEMO
Review the kiosk basket
Where: Kiosk menu → Place Order
123Click or tap the picture to open the original full-size screenshot. Use your browser’s Back button or close the image tab to return.
Read the item list. Use − or + to correct the quantity.
Choose Add More Items if something is missing. Check the total below.
Tap Checkout when the basket is correct, then follow the configured payment or pay-later instructions. Keep the final order number.
What you should see: The order moves to checkout. Reaching this cart alone does not mean the order has been submitted.
Tap the welcome screen to begin.
Choose the offered order type, such as Dine In or Takeaway. Follow the table selection prompt if it appears.
Browse categories and tap an item. Read its description and price.
Choose the required options and any extras. Check extra charges, set the quantity, and add it to the cart.
Open the cart. Check items, quantities, options, and the total. Remove mistakes before continuing.
Continue to checkout and use the payment route offered by this kiosk. Follow the app and terminal prompts; payment choices vary by setup.
Wait for the final confirmation. Keep the order number and receipt, when provided. Watch the collection display or ask staff where to wait.
CHAPTER 08
Staff walkthrough: cashier
The POS is the staff till: it handles sales, orders, payments, and shifts.
Follow the actual screens
REAL APP SCREEN · LOCAL DEMO
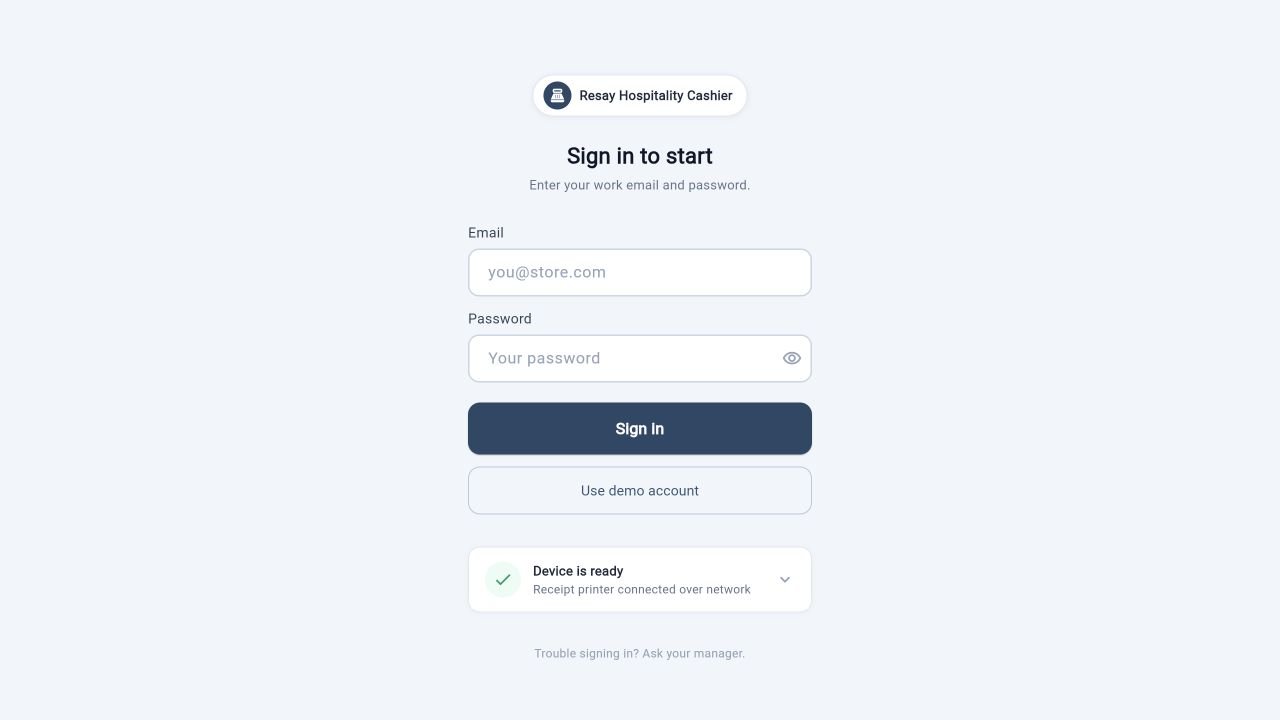
Start at the staff sign-in screen
Where: Cashier app → Sign in
Click or tap the picture to open the original full-size screenshot. Use your browser’s Back button or close the image tab to return.
Enter the assigned email and password.
Select Sign In. The Use demo account button belongs to a test workflow.
If this is a new terminal, continue through device pairing before entering your staff passcode.
What you should see: The app opens Pair Device, or resumes the next setup step.
REAL APP SCREEN · LOCAL DEMO
Link this cashier terminal to a branch
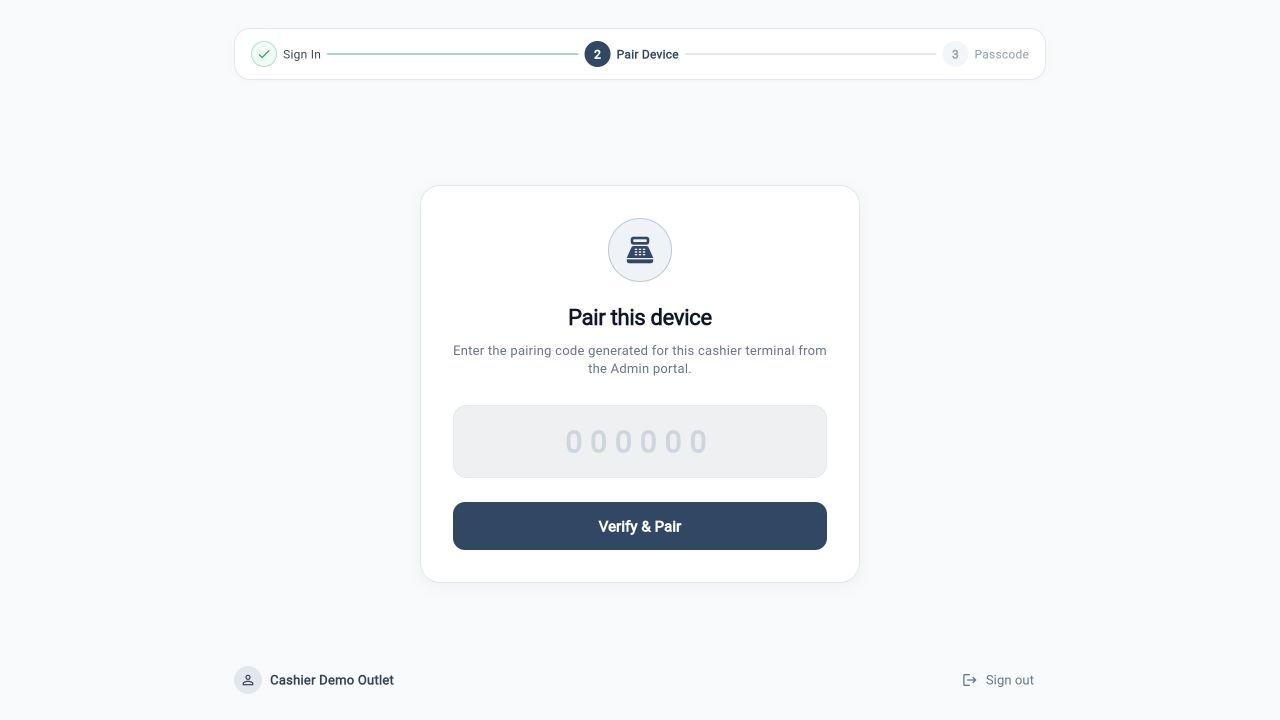
Where: Cashier → Pair Device
123Click or tap the picture to open the original full-size screenshot. Use your browser’s Back button or close the image tab to return.
Ask the manager for a code from Admin → POS Setup.
Enter that code in the large code field. Do not use your staff PIN here.
Tap Verify & Pair. Confirm the branch shown on the next screen.
What you should see: The terminal is paired and the staff passcode screen opens.
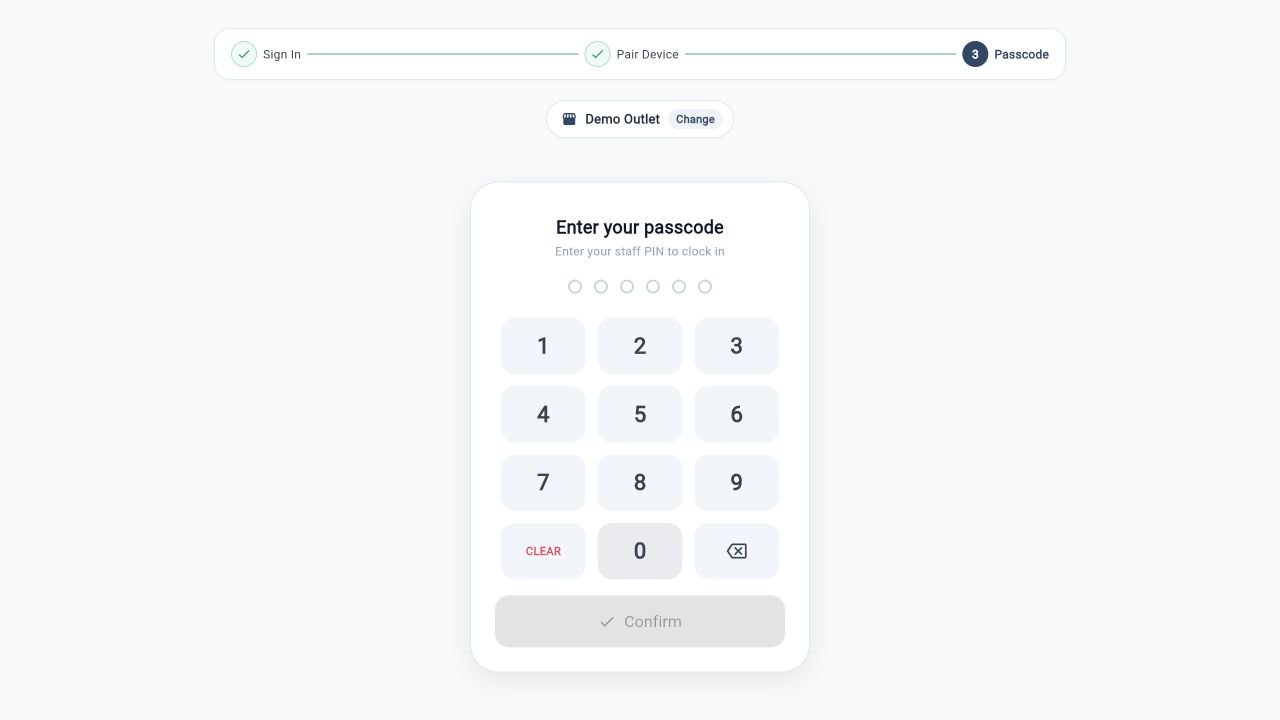
REAL APP SCREEN · LOCAL DEMO
Identify the person working
Where: Cashier → Passcode
123Click or tap the picture to open the original full-size screenshot. Use your browser’s Back button or close the image tab to return.
Check the branch name at the top. Use Change if the terminal is pointed at the wrong branch.
Enter your own assigned staff PIN using the keypad.
Tap Confirm. If the PIN is not accepted, ask the manager to check your staff setup.
What you should see: The clock-in confirmation identifies the staff member and branch.
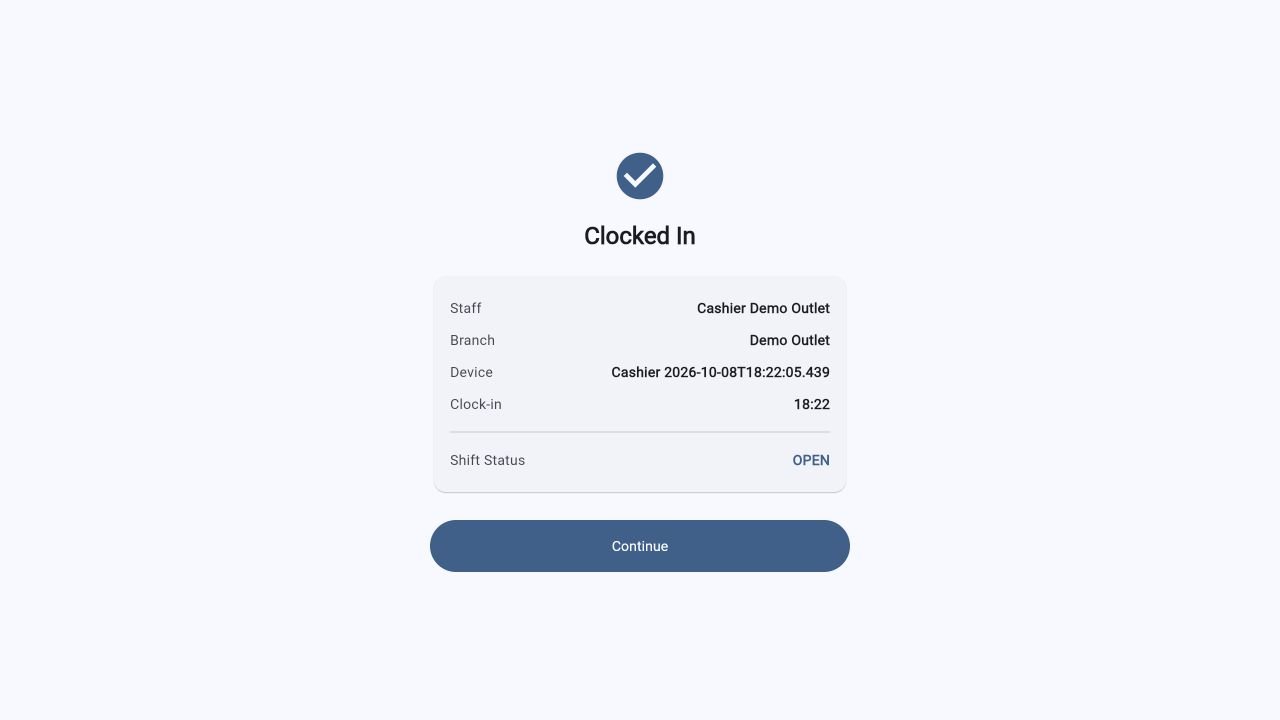
REAL APP SCREEN · LOCAL DEMO
Check your clock-in details
Where: Cashier → Clocked In
Click or tap the picture to open the original full-size screenshot. Use your browser’s Back button or close the image tab to return.
Read the Staff and Branch rows.
Check the device and shift information.
Tap Continue to count the opening cash.
What you should see: You proceed to the opening drawer screen.
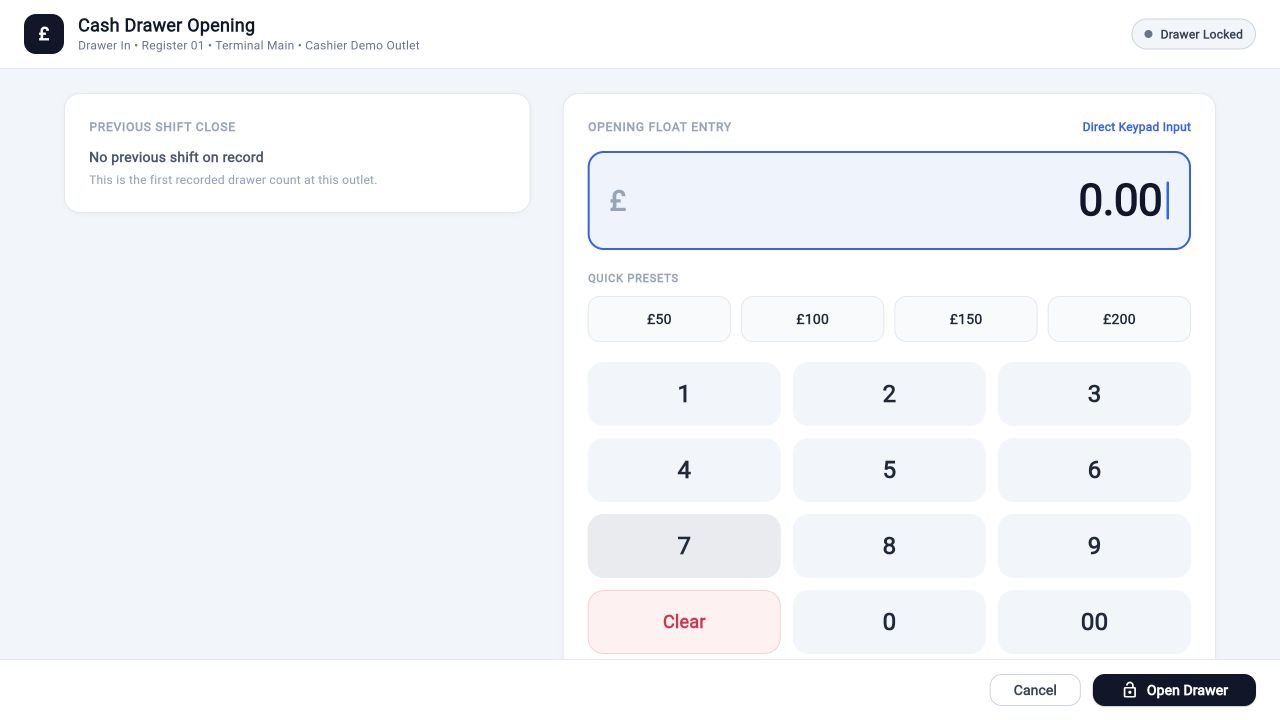
REAL APP SCREEN · LOCAL DEMO
Record the cash already in the drawer
Where: Cashier → Cash Drawer Opening
123Click or tap the picture to open the original full-size screenshot. Use your browser’s Back button or close the image tab to return.
Count the physical cash before entering a number. Previous Shift Close is a reference, not a replacement for your count.
Use the keypad or a matching preset to enter the opening amount. In this training example, the amount is 0.00.
Check the amount, then tap Open Drawer. For real service, use the amount actually counted.
What you should see: The opening cash amount is recorded and the cashier workspace becomes available.
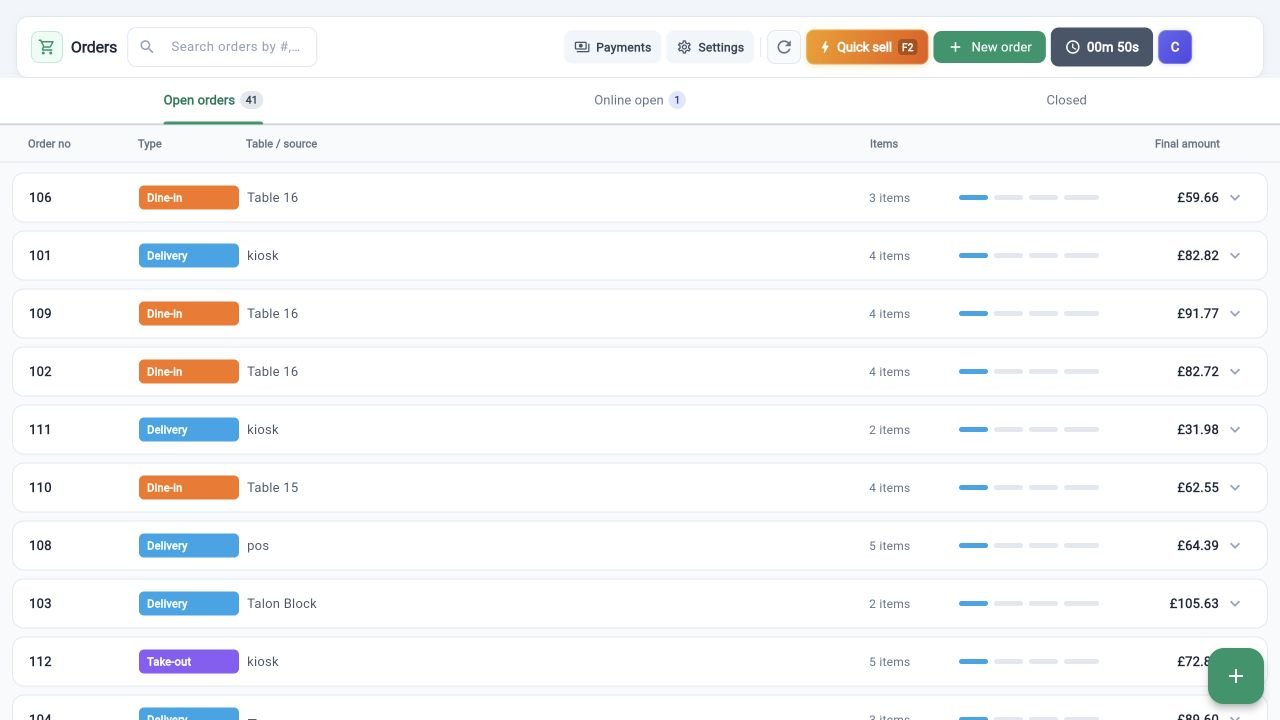
REAL APP SCREEN · LOCAL DEMO
Find an order or begin a sale
Where: Cashier → Orders
123Click or tap the picture to open the original full-size screenshot. Use your browser’s Back button or close the image tab to return.
Use the search box to find an existing order number. Check Open orders, Online open, or Closed as appropriate.
Tap an order row to inspect that ticket. Check its payment before collecting money.
For a new counter sale, tap New order. Quick sell is a separate rapid-sale route.
What you should see: You either open the original ticket or begin a new sale without duplicating an existing order.
REAL APP SCREEN · LOCAL DEMO
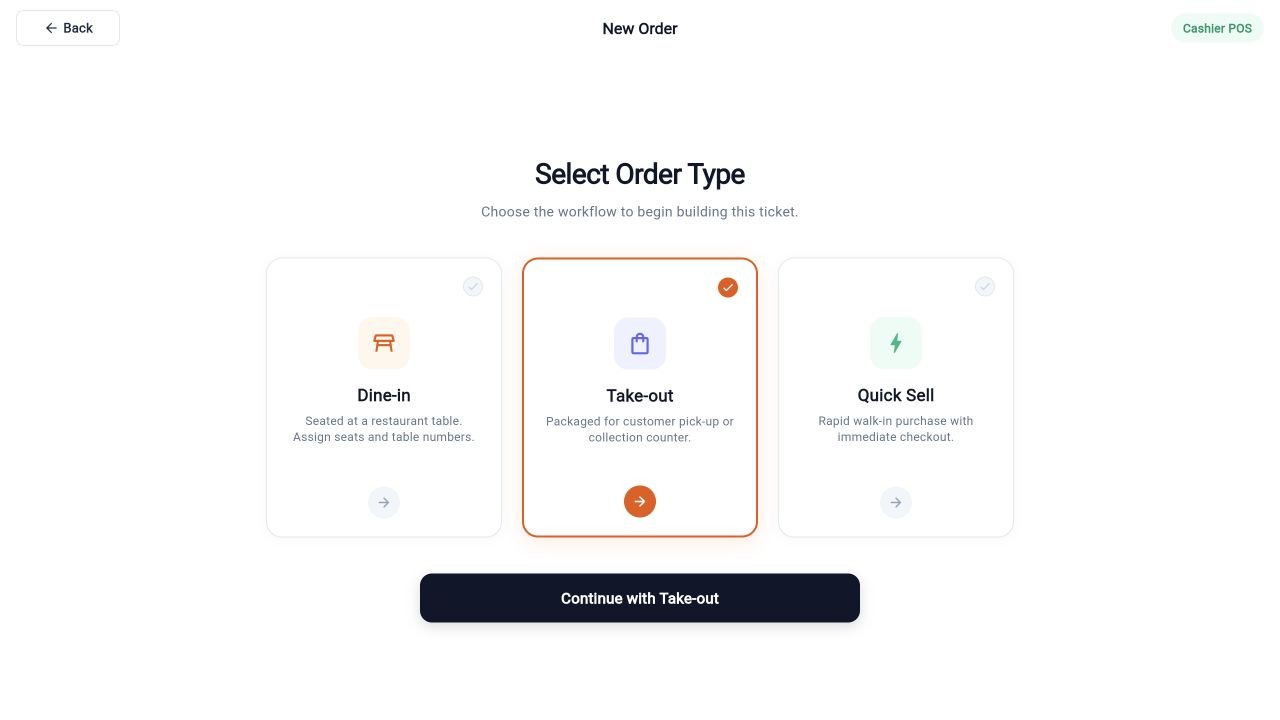
Start a takeaway counter order
Where: Cashier → New order
123Click or tap the picture to open the original full-size screenshot. Use your browser’s Back button or close the image tab to return.
Select Dine-in, Take-out, or Quick Sell according to the customer’s request.
In this example, Take-out is selected.
Tap Continue with Take-out.
What you should see: The product menu opens with Take-out selected.
REAL APP SCREEN · LOCAL DEMO
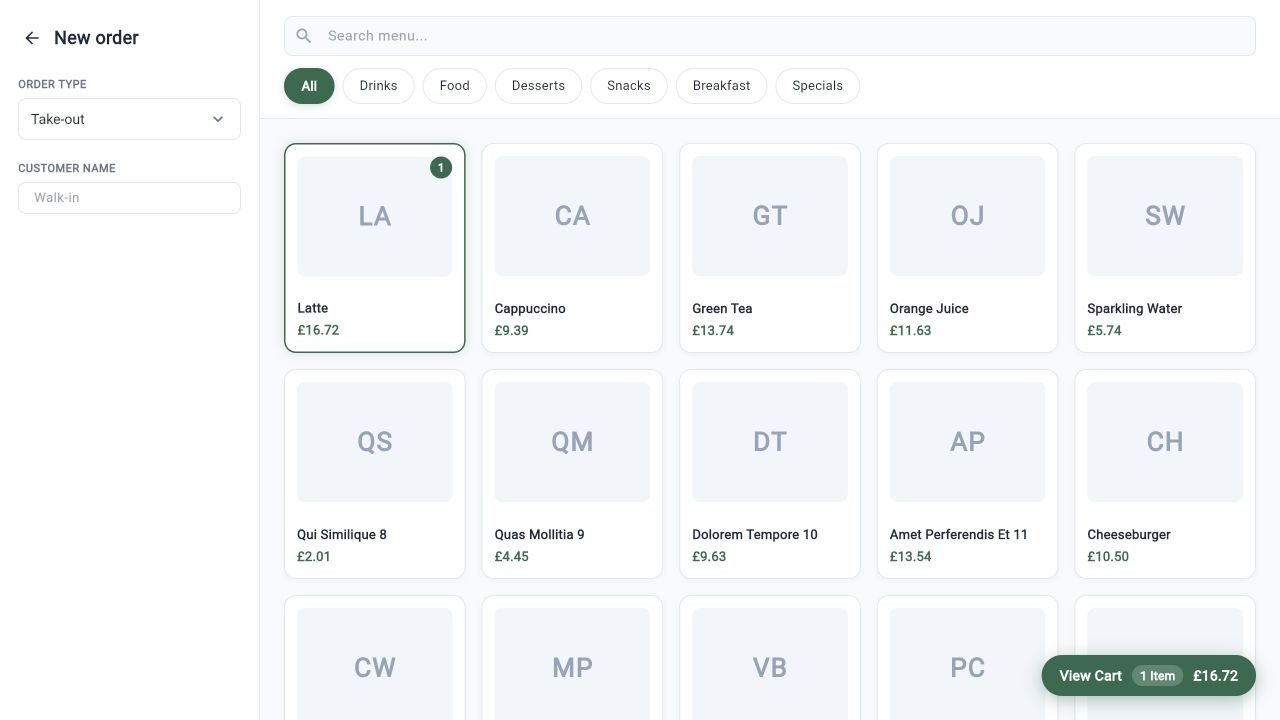
Build the counter order
Where: Cashier → New order → product menu
123Click or tap the picture to open the original full-size screenshot. Use your browser’s Back button or close the image tab to return.
Check Order Type and enter the customer name if needed.
Use Search menu or a category, then tap an item. Complete any required options.
Tap View Cart at the bottom right to review the items and amount.
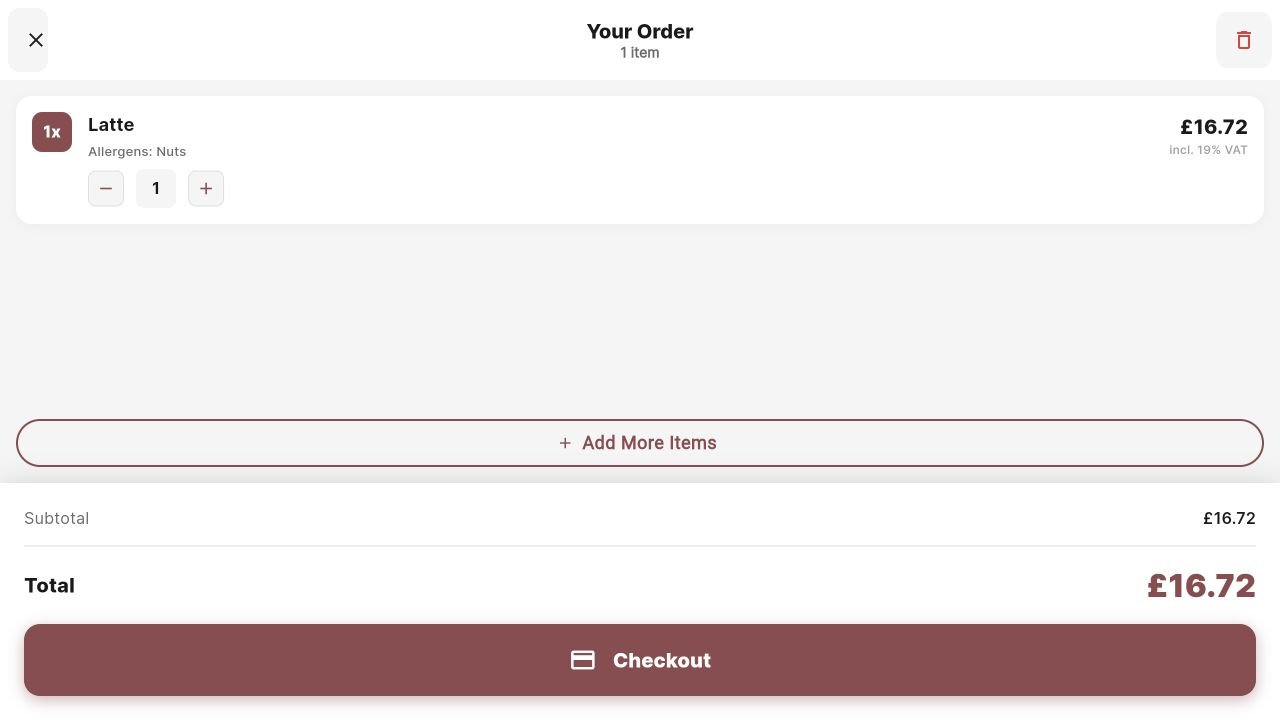
What you should see: The cart contains the requested food; the example shows one Latte.
REAL APP SCREEN · LOCAL DEMO
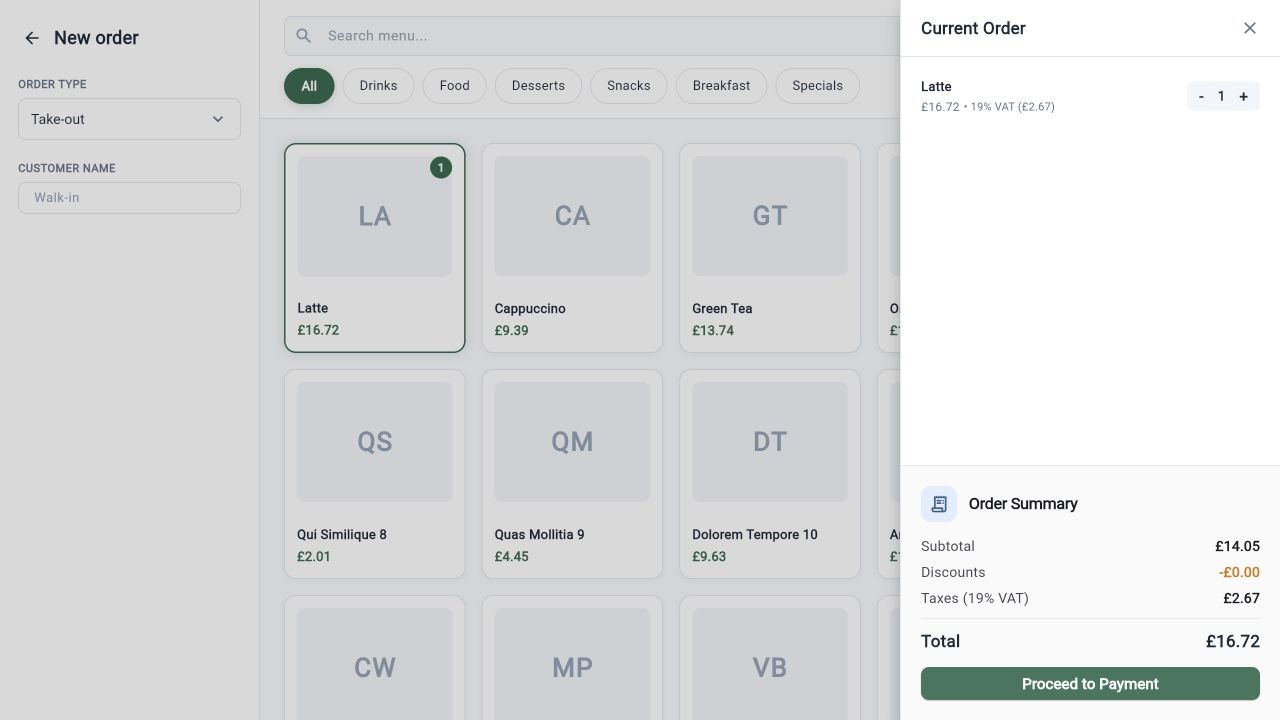
Check quantities and total
Where: Cashier → View Cart
123Click or tap the picture to open the original full-size screenshot. Use your browser’s Back button or close the image tab to return.
Read the item list and use − / + to correct quantities.
Review Order Summary, including discounts, tax, and total.
Tap Proceed to Payment. In the demonstrated Take-out flow, the next page is a review screen with Create order.
What you should see: You reach the checkout review. No payment has been collected just by opening this panel.
REAL APP SCREEN · LOCAL DEMO
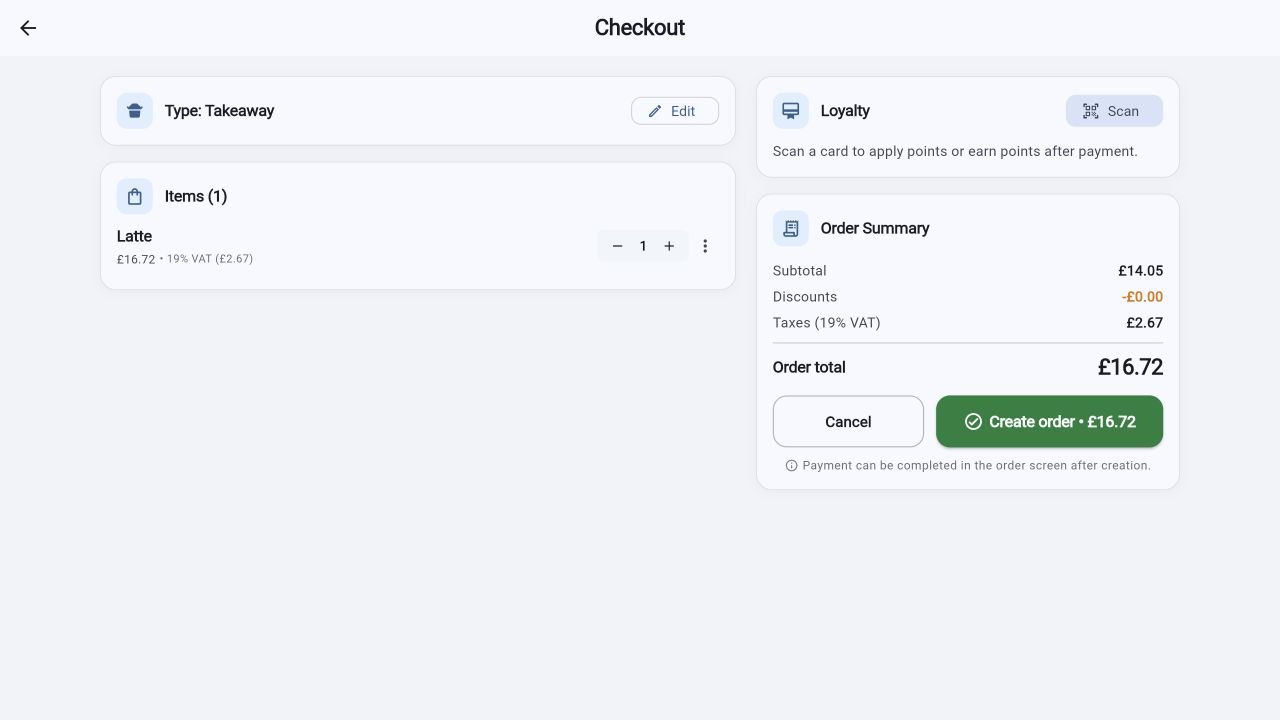
Create the ticket before collecting payment
Where: Cashier → Checkout
123Click or tap the picture to open the original full-size screenshot. Use your browser’s Back button or close the image tab to return.
Check the order type and items. Use Edit if the order type is wrong.
Review the total and apply loyalty through the available flow before creating the ticket.
Tap Create order. The message underneath explains that payment can be completed in the order screen after creation.
What you should see: The app opens the new order with its number and unpaid amount.
Begin your shift
Sign in to the Cashier app using the account assigned for that device or role.
If prompted, enter the branch’s POS device pairing code. A paired device can skip this step on later launches.
Enter your own staff passcode. Confirm the staff profile and branch shown.
Complete clock-in and count the opening cash float when prompted. Enter the amount actually in the drawer.
Check the menu, printer, and configured card payment connection before taking a sale.
Take a counter order
Select New order, choose the order type, and use its Continue button. Choose the table if requested.
Add menu items and their required modifiers. Read the order back to the customer.
Review quantities, extras, discounts or loyalty use, and the total before payment.
In the demonstrated Take-out flow, review Checkout and select Create order, then choose the payment action on the order screen. Follow any cash amount/change prompts or wait for the card provider result. Other order modes can use a different payment sequence.
Check the recorded payment result and order number. Print or reprint the receipt if needed.
Use the order list to follow preparation and complete the applicable handover action once the food is ready.
CHAPTER 09
Staff walkthrough: kitchen
The Chef app is the kitchen display system, often shortened to KDS.
Follow the actual screens
REAL APP SCREEN · LOCAL DEMO
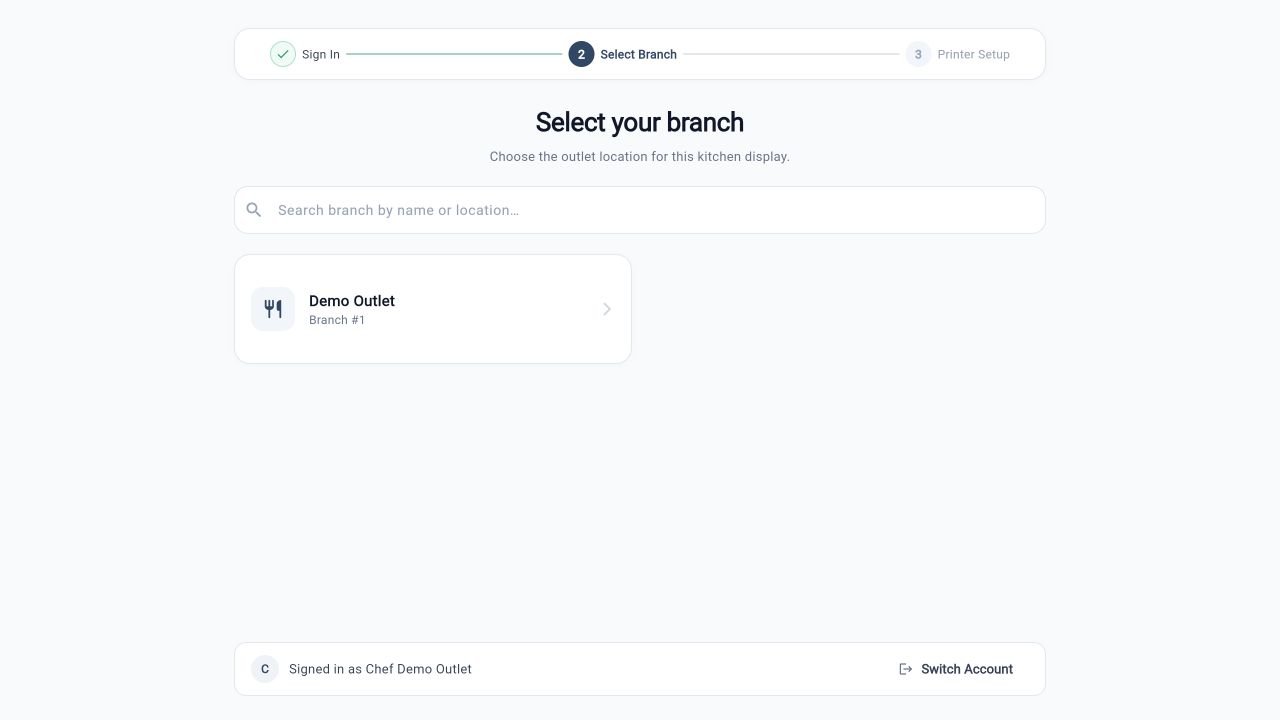
Choose the kitchen location
Where: Chef app → Sign in → Select Branch
123Click or tap the picture to open the original full-size screenshot. Use your browser’s Back button or close the image tab to return.
Read the branch names available to your account.
Tap the branch this kitchen serves. In the example it is Demo Outlet.
Check the signed-in staff identity at the bottom; use Switch Account if needed.
What you should see: Printer Configuration opens for the selected branch.
REAL APP SCREEN · LOCAL DEMO
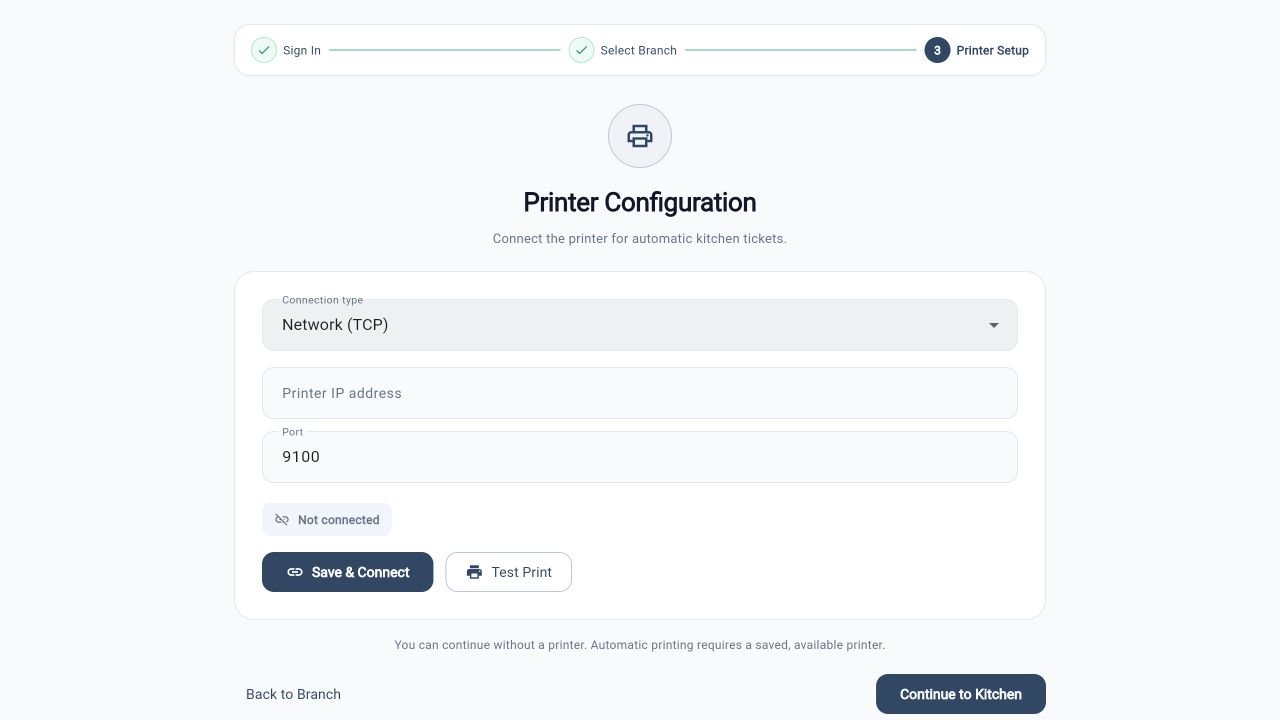
Set up kitchen printing
Where: Chef app → Printer Configuration
123Click or tap the picture to open the original full-size screenshot. Use your browser’s Back button or close the image tab to return.
Choose the connection type. For Network (TCP), enter the printer’s actual IP address and port supplied by your team.
Select Save & Connect, then Test Print. A successful screen connection alone does not prove a ticket printed.
Tap Continue to Kitchen. This build allows continuing without a printer; automatic tickets require a saved, available printer.
What you should see: The Kitchen Board opens. The screenshot shows a demo with no physical printer connected.
REAL APP SCREEN · LOCAL DEMO
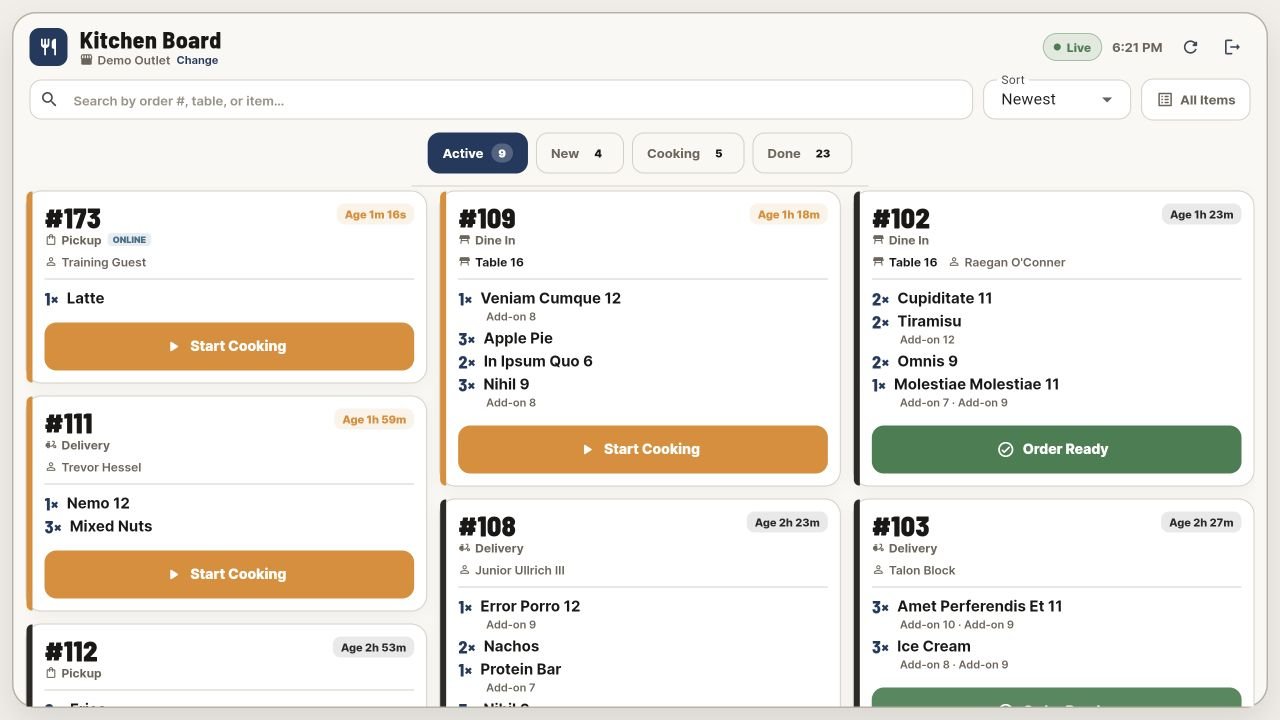
Read the board and start cooking
Where: Chef app → Kitchen Board
123Click or tap the picture to open the original full-size screenshot. Use your browser’s Back button or close the image tab to return.
Check the branch, then use Search and the Active, New, Cooking, or Done filters.
Find the correct order number. Read quantities, order type, table/customer details, and modifiers.
Tap Start Cooking on that ticket when preparation begins. The green Order Ready action is for tickets already being prepared.
What you should see: The ticket moves into cooking. Order #173 is the same training order shown in the customer tracking screenshot.
REAL APP SCREEN · LOCAL DEMO
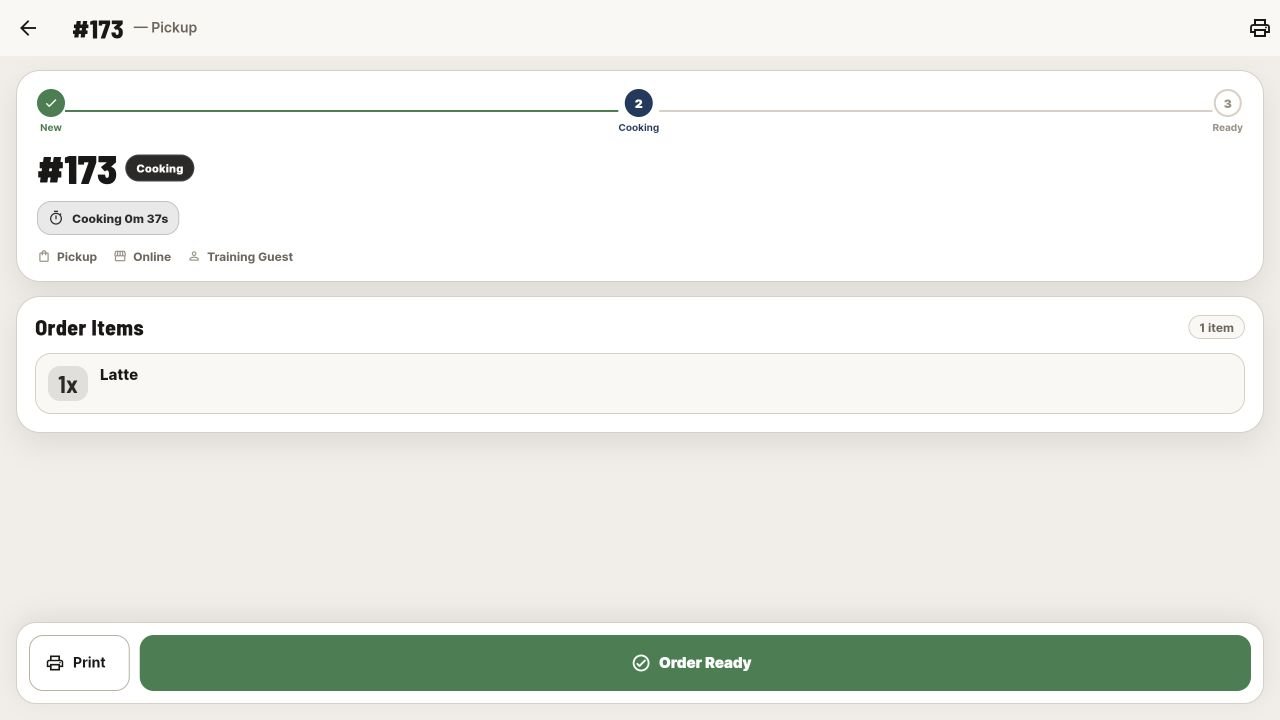
Mark a prepared order ready
Where: Kitchen Board → tap a ticket
123Click or tap the picture to open the original full-size screenshot. Use your browser’s Back button or close the image tab to return.
Check the large ticket number and status.
Read the full Order Items list and confirm everything has been prepared.
Tap Order Ready at the bottom when ready for handover. Print produces a ticket only with a working configured printer.
What you should see: The food status changes to ready; the cashier still needs to check payment separately.
Sign in, select your branch, and complete Printer Setup. The current setup offers Network (TCP), Bluetooth, and USB; use the supported connection for your device. Use Test Print, then Continue to Kitchen.
Read each ticket’s order number, type, table if present, quantities, modifiers, and notes. Check everything before starting.
Open the order and tap Start Cooking when preparation begins.
Prepare every item, including its requested options. Use elapsed time and the board’s filters to manage the queue.
Tap Order Ready only when the order is ready for handover. Confirm that its status changes.
Use Print on the order if a ticket is needed and a working printer is configured.
EXAMPLE TICKET · 042
Incoming
1 × Burger + Extra cheese Takeaway
Start Cooking
→
EXAMPLE TICKET · 042
Preparing
Check all items Pack the order Match the ticket
Order Ready
Teaching diagram using the current action labels, not a screenshot or live order.
CHAPTER 10
Customer walkthrough: phone or web
Customers open the restaurant’s ordering link or scan its QR code. No customer app installation is needed.
Follow the actual screens
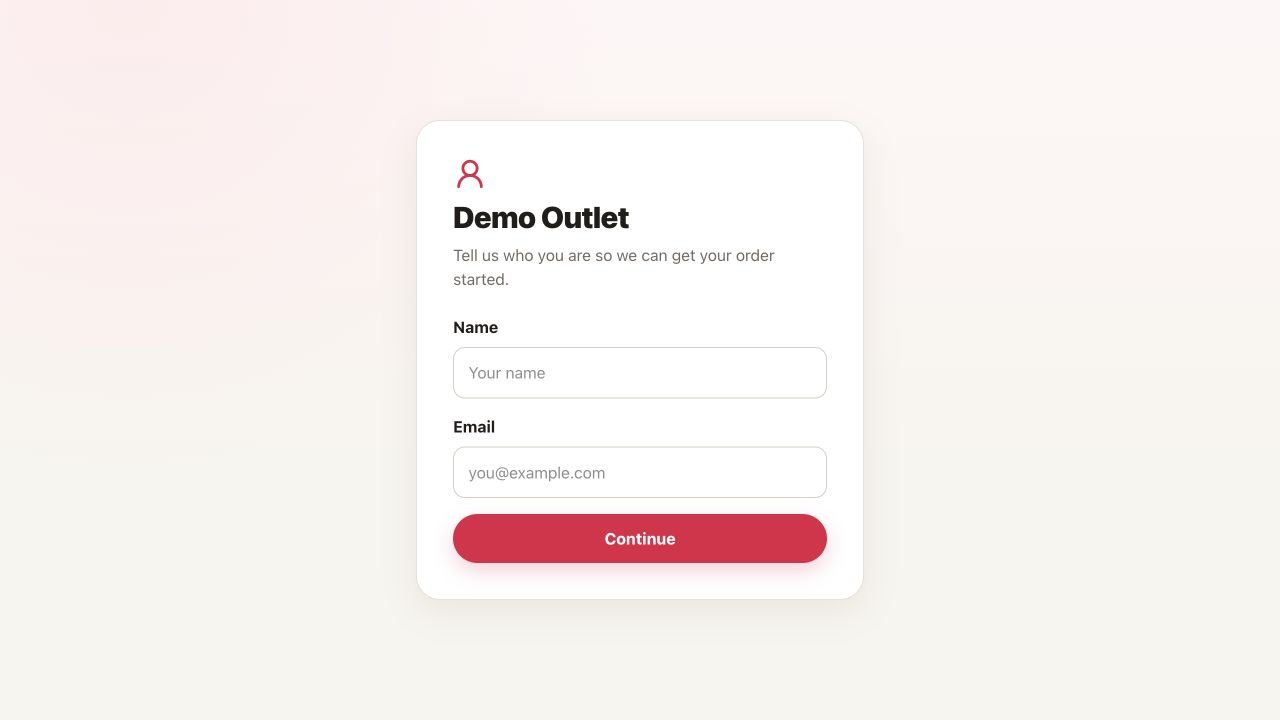
REAL APP SCREEN · LOCAL DEMO
Tell the restaurant who is ordering
Where: Restaurant link / QR → welcome
Click or tap the picture to open the original full-size screenshot. Use your browser’s Back button or close the image tab to return.
Check the restaurant name.
Enter your name and email in the labeled fields.
Tap Continue. These details identify the order; follow any account prompts your restaurant shows.
What you should see: The order-type choices appear.
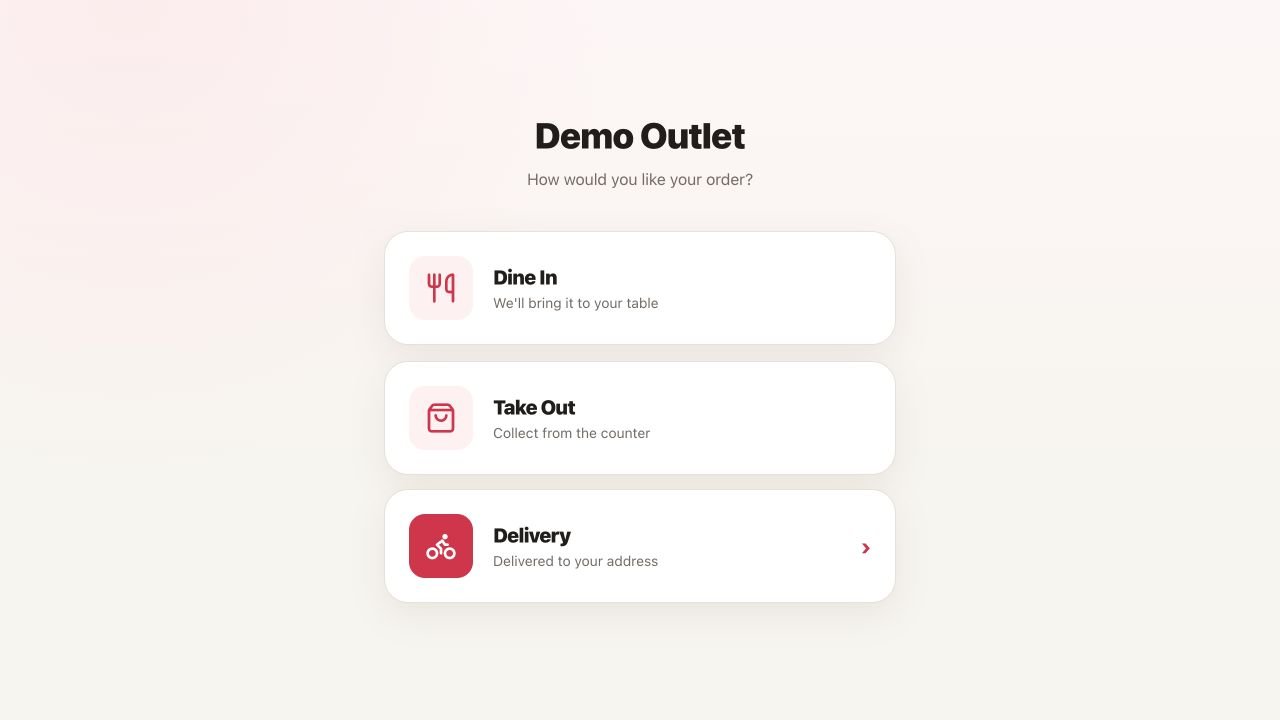
REAL APP SCREEN · LOCAL DEMO
Select dine-in, collection, or delivery
Where: Online portal → order type
Click or tap the picture to open the original full-size screenshot. Use your browser’s Back button or close the image tab to return.
Choose Dine In if you are eating at a table.
Choose Take Out to collect from the counter, as in this example.
Choose Delivery only when you need delivery and the restaurant offers it.
What you should see: The menu opens for the selected order type.
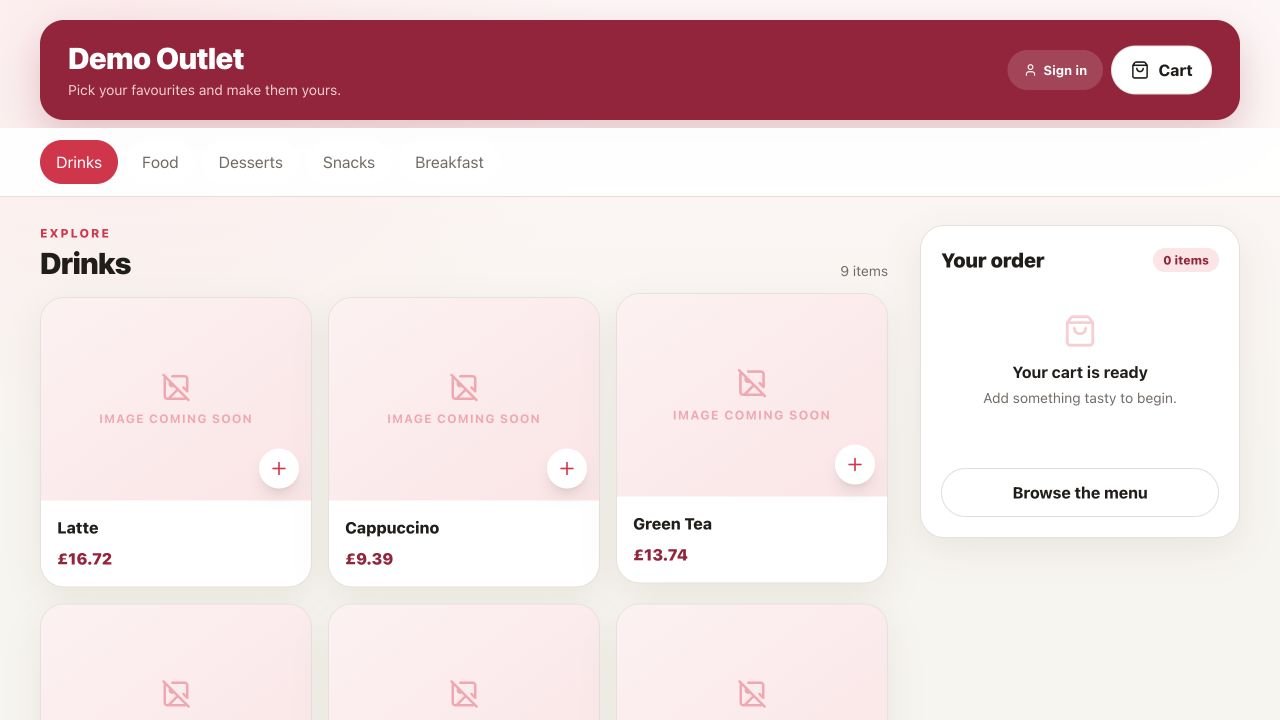
REAL APP SCREEN · LOCAL DEMO
Choose items on the customer menu
Where: Online portal → menu
Click or tap the picture to open the original full-size screenshot. Use your browser’s Back button or close the image tab to return.
Use the category buttons to browse.
Select an item, complete any options, and check its price.
Open Cart or Review cart after adding the items you want.
What you should see: Your order summary lists the selected items. Demo images may show Image coming soon.
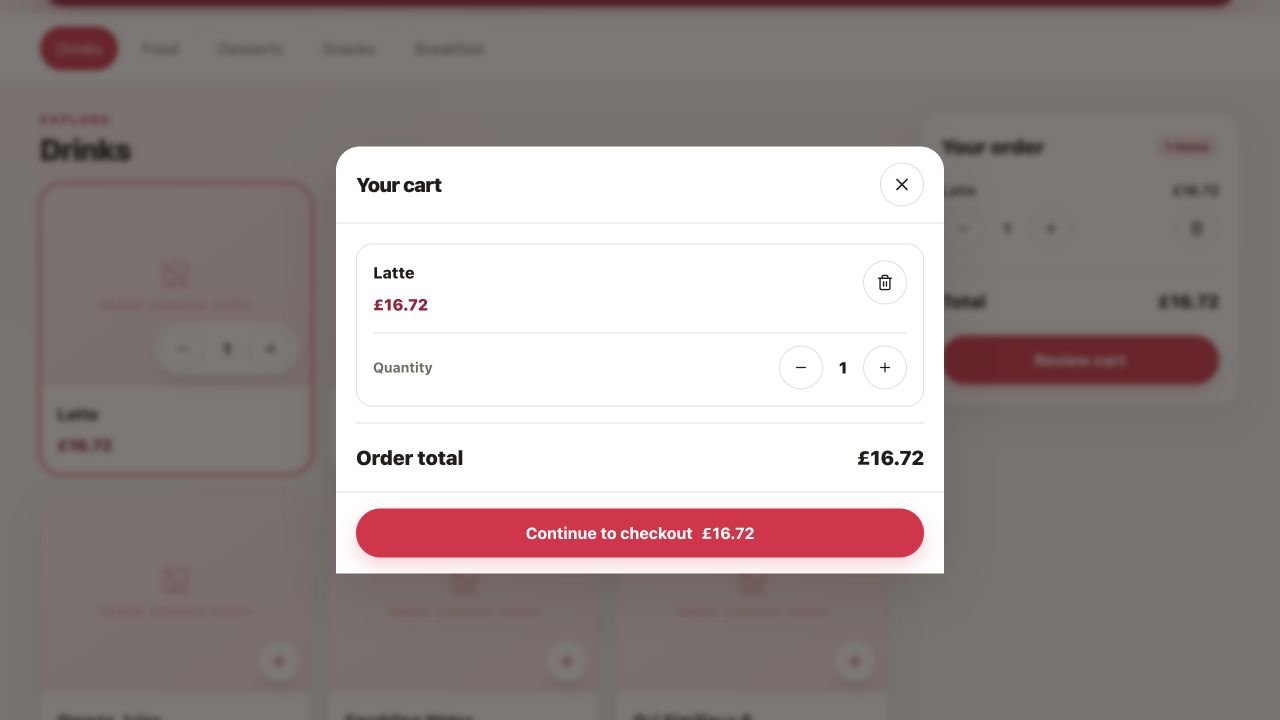
REAL APP SCREEN · LOCAL DEMO
Review the online cart
Where: Customer menu → Cart / Review cart
123Click or tap the picture to open the original full-size screenshot. Use your browser’s Back button or close the image tab to return.
Use − or + to adjust quantity; the bin removes an item.
Read Order total and check that the basket matches your request.
Select Continue to checkout.
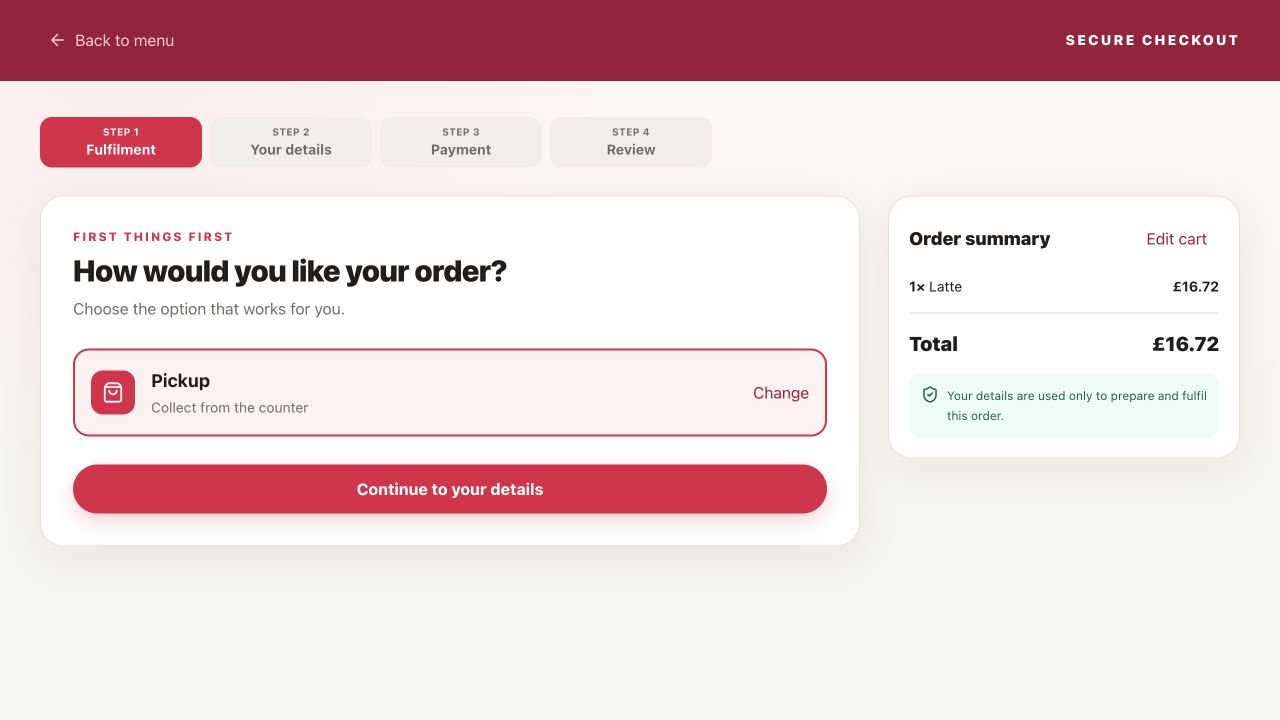
What you should see: Checkout opens at the Fulfilment step.
REAL APP SCREEN · LOCAL DEMO
Check how you will receive the order
Where: Checkout → Fulfilment
Click or tap the picture to open the original full-size screenshot. Use your browser’s Back button or close the image tab to return.
Confirm the fulfilment choice. This example says Pickup, meaning counter collection.
Use Change if the choice is wrong.
Select Continue to your details, then check the requested name, email, table, or delivery details.
What you should see: You can move to Payment after completing Your details.
REAL APP SCREEN · LOCAL DEMO
Choose the offered payment route
Where: Checkout → Payment
Click or tap the picture to open the original full-size screenshot. Use your browser’s Back button or close the image tab to return.
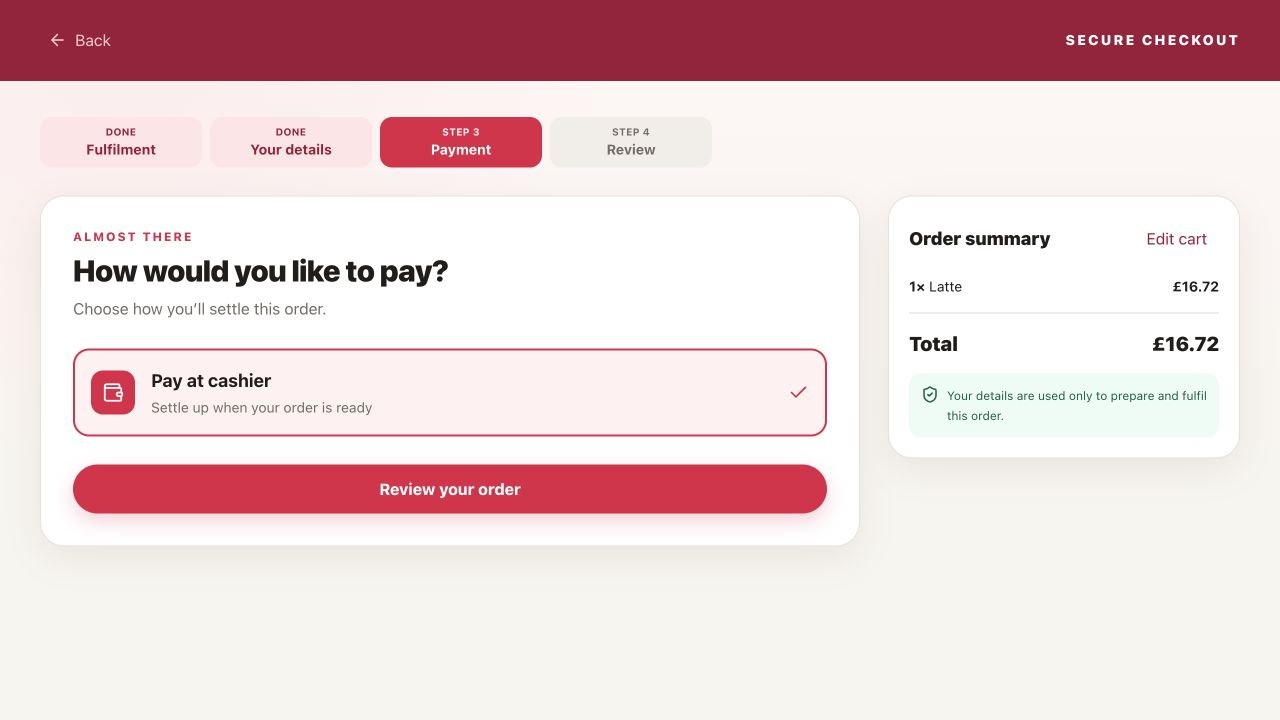
Read the available options. This demo offers Pay at cashier.
Select the option you intend to use. Only enabled payment methods appear.
Select Review your order.
What you should see: The final review shows your chosen payment method. Pay at cashier means money has not yet been collected.
REAL APP SCREEN · LOCAL DEMO
Check everything before placing the order
Where: Checkout → Review
123Click or tap the picture to open the original full-size screenshot. Use your browser’s Back button or close the image tab to return.
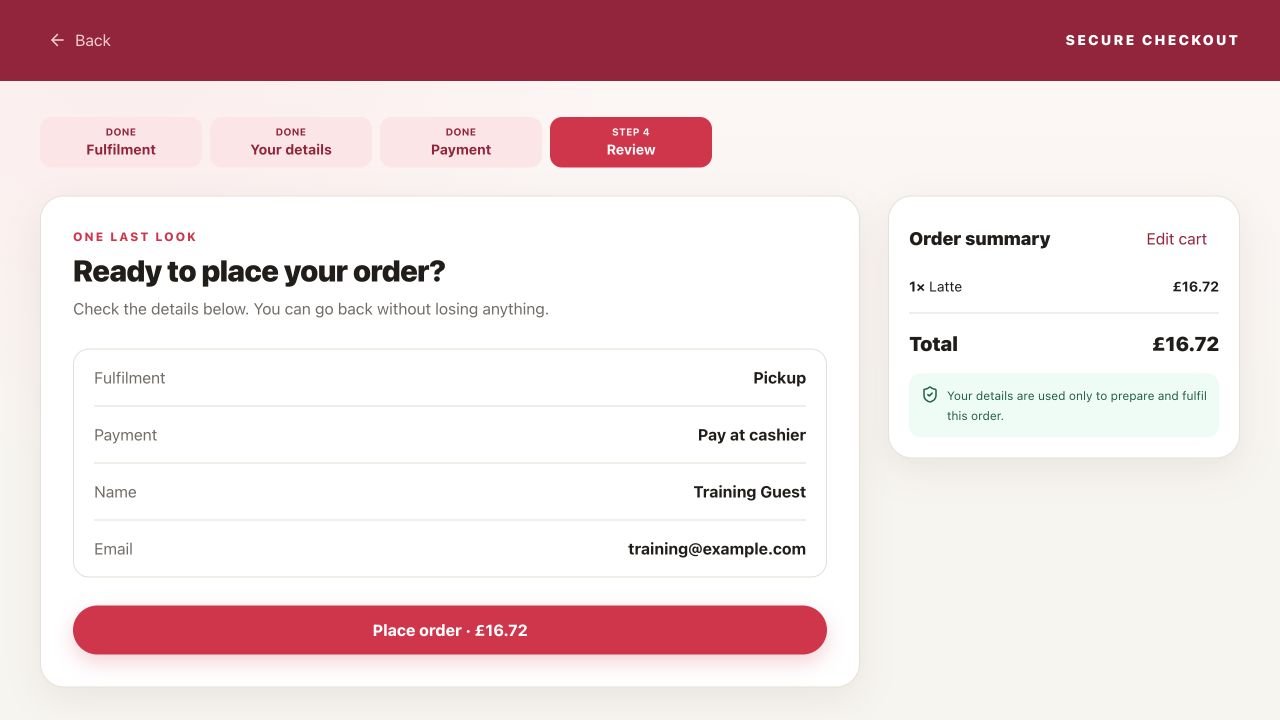
Read Fulfilment, Payment, Name, and Email. Use Back to correct details.
Check the Order summary and total. Edit cart changes the items.
Press Place order only when you intend to submit it, then wait for confirmation.
What you should see: The tracking page opens with an order number. Keep that number for staff.
REAL APP SCREEN · LOCAL DEMO
Follow your order number
Where: After placing the order → tracking
Click or tap the picture to open the original full-size screenshot. Use your browser’s Back button or close the image tab to return.
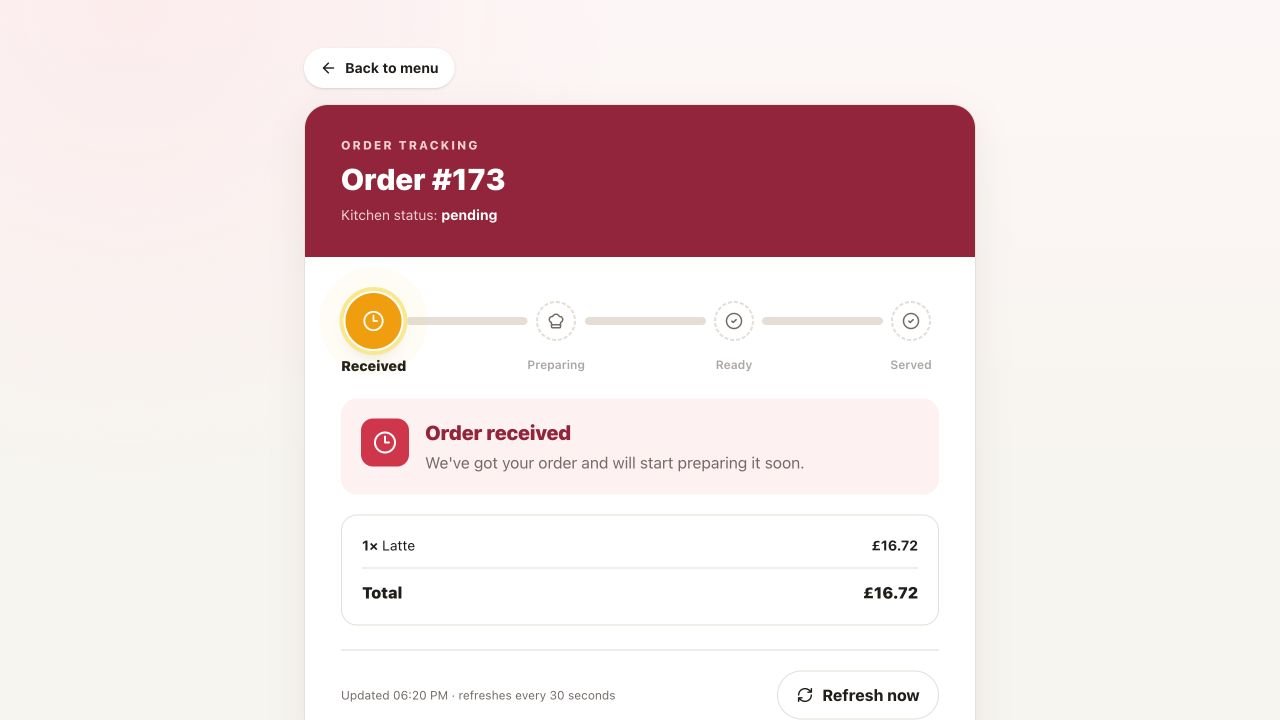
Keep the order number at the top. This training order is #173.
Follow Received → Preparing → Ready → Served. These labels describe food progress.
Use Refresh now if needed. Keep following the payment instructions chosen at checkout.
What you should see: You can compare the same number with the kitchen or cashier; a received order is not automatically a paid order.
Open the full restaurant link. A generic portal address without the restaurant information may show a “restaurant not found” or no-outlet screen.
Follow the welcome or account steps. Guest ordering is supported in the current portal; account and saved-profile options may also appear.
Choose an available order type. A valid table QR can lock the order to that table and dine-in mode.
Add food, choose modifiers, and review the cart. Switching order type may change prices, so review the total again.
At checkout, enter the details requested for that order type, such as table or delivery information.
Follow the configured pay-now or pay-later instructions. Online card payment appears only where it is enabled.
Keep the order confirmation or tracking page. Use My Orders where available to revisit orders. Do not clear the browser’s saved data if relying on guest history.
CHAPTER 11
Tables, QR codes, and the collection screen
Help the customer order from the correct location and collect the right meal.
Follow the actual screens
REAL APP SCREEN · LOCAL DEMO
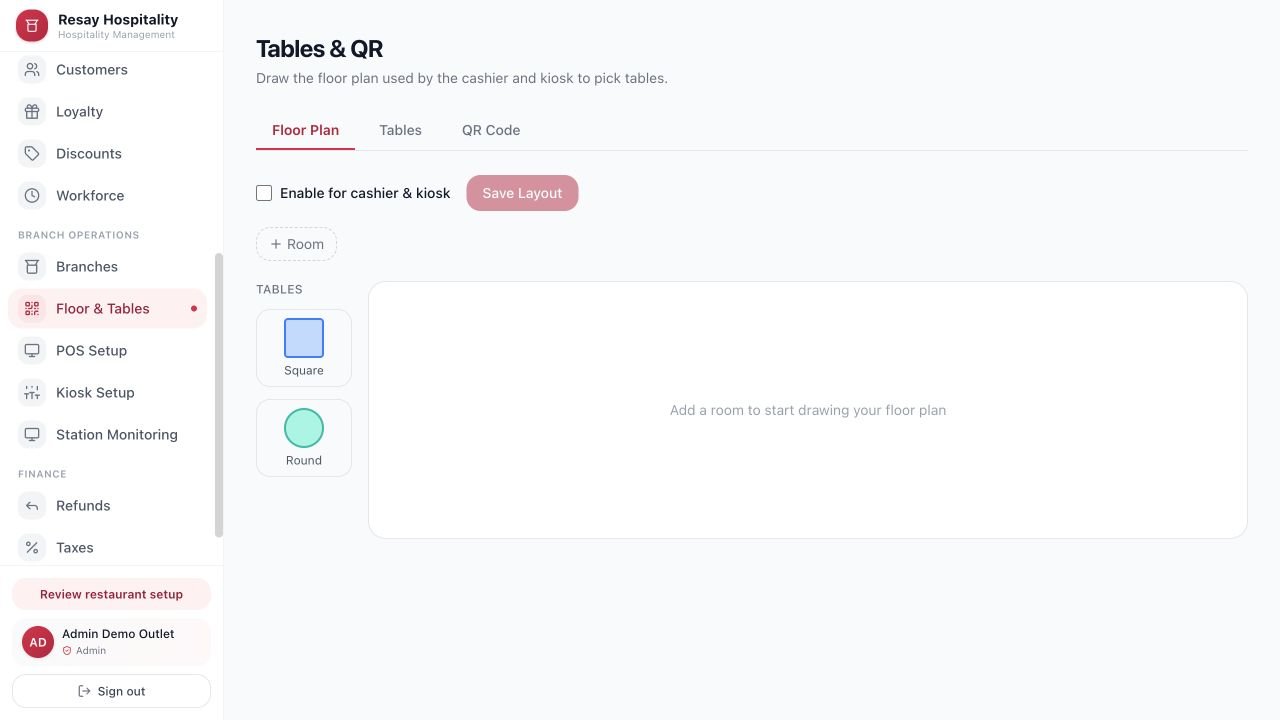
Find the floor plan, tables, and QR tools
Where: Admin → Floor & Tables
Click or tap the picture to open the original full-size screenshot. Use your browser’s Back button or close the image tab to return.
Choose Floor Plan, Tables, or QR Code from the top tabs.
In an empty floor plan, add a Room before placing tables. Use Square or Round as appropriate for your layout.
Review the setup and save the layout when ready. The screenshot is an empty demo, so Save Layout is disabled.
What you should see: The selected tab exposes the relevant table or ordering-link tools.
Floor Plan
In Floor & Tables → Floor Plan, maintain the layout used to select tables.
Tables
In the Tables tab, manage tables and their table-specific QR ordering codes.
QR Code
The QR Code tab provides the outlet ordering link. Test it on a phone before displaying it.
Status display
Pair the customer-facing display to the branch. Check that preparing and ready order numbers update during a rehearsal.
Choose the branch before editing its floor plan or tables.
Make table names/numbers match the physical labels in the restaurant.
Scan a printed QR and verify the restaurant, table behavior, and menu.
When handing over a meal, match the customer’s number with the ticket and verify the payment status.
CHAPTER 12
Payments, receipts, and refunds
Check the money result separately from the food status.
Follow the actual screens
REAL APP SCREEN · LOCAL DEMO
Check food progress and money separately
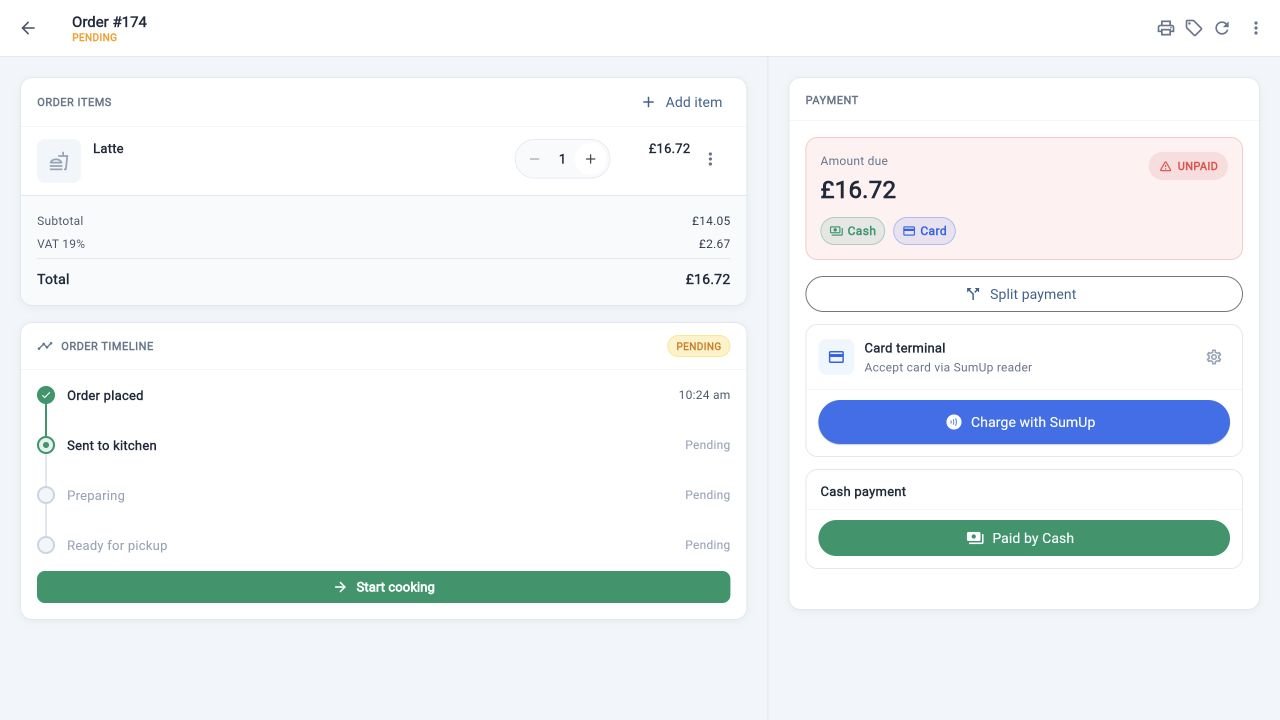
Where: Cashier → open an order
123Click or tap the picture to open the original full-size screenshot. Use your browser’s Back button or close the image tab to return.
Match the order number and items on the left to the customer’s ticket. The timeline below tracks food preparation.
On the right, read Amount due and the UNPAID/paid status. Choose the appropriate payment action, such as Paid by Cash or the configured card provider.
Complete that payment flow and verify its final result. Do not use Start cooking as proof that payment was received.
What you should see: The payment record reflects the money actually collected. This screenshot stops before any cash or card payment.
Situation
What to do
Cash payment
Count the amount received, enter it, check the change, and confirm the payment record.
Card payment
Use the configured provider and device flow; wait for success or failure and check the recorded transaction.
Unclear or interrupted payment
Find the order and provider reference first. Ask the manager to reconcile the result before another charge.
Receipt did not print
Check power, connection, and paper, then reprint the existing receipt when supported.
Cancellation
Stopping food preparation is separate from returning money. Check whether a refund is needed.
Refund
An authorized operator should find the original payment, use its available refund action, review amount and reason, and confirm the final result.
Admins configure the current combined Integrations & Payments page. Use Receipts for receipt settings and, where enabled, Label Templates / Label Printer for labels. The Admin Refunds page lets managers review recorded refund details; do not assume viewing a refund record initiates a new refund.
CHAPTER 13
Delivery: what is available now
Separate delivery assignment from the current rider tools.
In the Delivery app’s dispatcher view, locate the delivery order and check the customer details and address.
Tap Assign rider, select a listed rider, and confirm the assignment updates. If no riders are available, ask the manager to check rider setup.
Match the food bag to the order number before handing it to the rider.
For location updates in this build, the rider screen is labeled Rider-lite location updater. It accepts a delivery rider ID, latitude, and longitude, then Send location. This is a manual tool; use only real, verified values under your team’s procedure.
Customer tracking can display delivery information when supplied. Follow the deployed workflow for delivery completion and ask the manager if the necessary controls are missing.
CHAPTER 14
Keep daily operations organized
Use these tools after the basic ordering flow works.
Area
Beginner workflow
Inventory
Choose the branch, locate an item, review its stock information, and record authorized changes. Check that the customer-facing availability is correct too.
Customers
Find the intended customer before editing their details or reviewing activity.
Loyalty
Find or create the appropriate loyalty card, review points and history, and apply the available redemption flow before payment. Confirm the new total.
Discounts
Review the discount’s conditions and eligibility. Check the order total before charging.
Workforce
Maintain staff access and review attendance or shift information. Each staff member should use their own identity/PIN.
Station Monitoring
Review device/terminal information when a station appears disconnected or inconsistent.
Online Orders / Transactions
Locate orders or payment records by number and available filters when investigating a customer question.
Feature Modules
An admin can review which features are enabled. A hidden menu can be caused by permissions or feature settings.
Appearance / Currency / Taxes
Review these as business configuration. Check the effect on the menu, checkout, and receipts after an authorized change.
CHAPTER 15
Close the shift and read reports
Finish with a counted drawer and a clear record of the day.
Follow the actual screens
REAL APP SCREEN · LOCAL DEMO
Read reports for the correct period
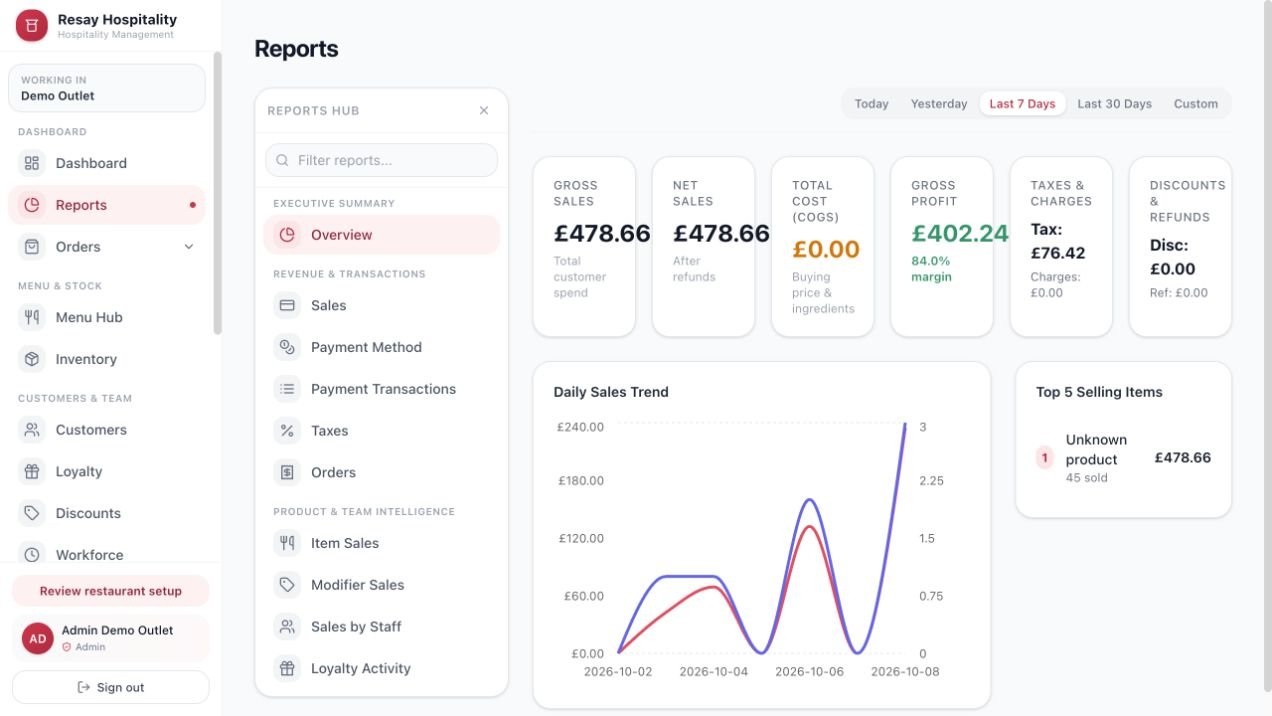
Where: Admin → Reports
Click or tap the picture to open the original full-size screenshot. Use your browser’s Back button or close the image tab to return.
Choose a report from the Reports Hub list, such as Sales, Payment Method, or Orders.
Select Today, Yesterday, Last 7 Days, Last 30 Days, or Custom.
Read the metric labels and compare like-for-like figures. Gross Sales, Net Sales, and cash counted are different measures.
What you should see: You know what period and type of record the displayed totals represent.
Resolve or hand over outstanding orders according to your restaurant’s procedure.
In the Cashier shift area, use Start Break / End Break during breaks. At shift end, choose Clock Out to begin the closing workflow.
Count the physical cash and complete drawer reconciliation. Record the actual amount; investigate any difference instead of changing the count to match an expected number.
Review the close-shift summary and finish the flow.
In Admin, check Shift Summary and Reports. Confirm the branch and date filters before comparing totals.
Report
Question it helps answer
Overview
How did the restaurant perform overall?
Sales / Payment Method
How much was recorded, and through which methods or sources?
Payment Transactions
Which individual payments make up the total?
Orders
Which orders were recorded?
Item Sales / Modifier Sales
Which foods and extras were sold?
Sales by Staff
Which sales are attributed to each staff member?
Taxes
What tax breakdown does the system report?
Loyalty Activity
What happened to customer points and rewards?
CHAPTER 16
Lite, full access, and Super Admin
Your account determines how much of this guide applies.
Lite uses a smaller set of screens. The current Lite navigation includes Dashboard, Menu Hub, Inventory, Orders, Tables & QR, Staff, and Settings, with access controlled by role. Use those screens for the same basic cycle: set up the menu, take an order, check payment, and review the result.
The full restaurant workspace exposes more operational pages when permitted and enabled. An admin generally has broader settings access than a manager. Ask the account administrator if a required page is absent.
Super Admin is for platform administration. Its current areas include companies, branches, users, Lite accounts, online orders, customers, kiosk settings, payment providers, and settings. Routine counter and kitchen staff do not need this workspace.
CHAPTER 17
When something goes wrong
Start with the branch, connection, and exact order number.
Follow the actual screens
REAL APP SCREEN · LOCAL DEMO
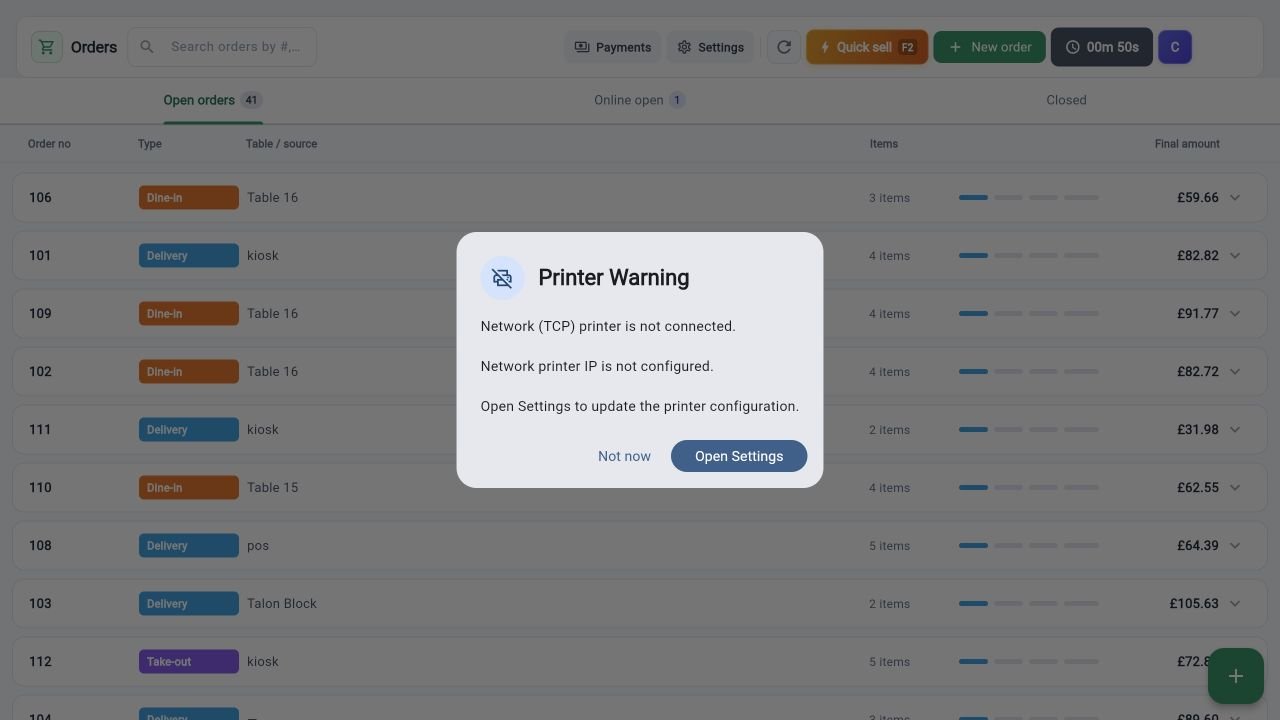
Understand a printer warning
Where: Cashier → Printer Warning
123Click or tap the picture to open the original full-size screenshot. Use your browser’s Back button or close the image tab to return.
Read the exact problem. This example says the network printer is not connected and its IP is not configured.
Use Open Settings to enter the correct printer setup and test it. Ask the manager for the printer’s connection details.
Not now dismisses the warning; it does not repair printing. Only continue without printing if that is acceptable for the current task.
What you should see: You know whether the printer still needs attention before serving customers.
Problem
Try this first
Cannot sign in
Check the assigned app, account, and password. Ask your administrator to confirm the account and role.
A menu or settings page is missing
Check role, edition, enabled modules, and selected branch.
No food appears
Confirm the branch, item availability, category, and saved menu. Compare Menu Hub Preview with the device.
Add Item is missing
Select one branch instead of All Branches, then open Menu Hub → Items.
Cannot add an item to the cart
Complete required modifier choices and check selection limits.
Device pairing fails
Check device type, branch, code status, and network. Use the correct setup page.
Kitchen cannot see the order
Compare order number, branch, status filters, and connection. Confirm the order was successfully submitted.
Card result is uncertain
Check the existing transaction and provider result before retrying.
Receipt is blank or missing
Check printer paper, power, connection, and test printing. Reprint the existing order when supported.
QR opens the wrong page
Use the full outlet link and test the printed QR. Check whether a table code is still valid.
Delivery location looks wrong
The rider tool is manual in this build. Confirm rider ID and actual coordinates; do not submit default sample values.
Report totals seem wrong
Use the same branch, dates, payment status, and metric. Account for refunds and different payment methods.
CHAPTER 18
Your first practice session
A manager can use this checklist to train a new team member.
Checklist marks are temporary and reset when the page reloads. Print this page if you need a lasting training record.
CHAPTER 19
Plain-language glossary
The short version of the words you will see.
Term
Meaning
Branch / outlet
One restaurant location.
POS
Point of sale: the cashier’s till system.
KDS
Kitchen display system: the kitchen order board.
Pairing
Linking a device to the correct branch.
Modifier
An option or extra attached to an item.
Combo
A bundle of menu items sold as a meal or deal.
Opening float
The cash already in the drawer at the start of a shift.
Reconciliation
Comparing the counted money with the recorded expected amount.
Transaction
A record of a payment or money-related operation.
Refund
Returning money from a previous payment.
QR code
A scannable code that opens a link, sometimes tied to a table.
Backend
The shared server used by the different apps. Your administrator maintains it.
CHAPTER 20
About this guide
Prepared from the current project source on 8 October 2026.
This is an end-user training guide, not a server installation manual. It describes the local source snapshot; installed apps may differ. The current kitchen onboarding files include local in-progress changes. Confirm the deployed build before training staff on newly added controls.
All illustrations and app screenshots are stored in this folder’s images directory. App captures show the actual interface running locally with demonstration data. The generated restaurant illustration and teaching diagrams remain clearly labeled. See screenshots.json for the capture inventory and routes. Delivery, status-display, and Super Admin instructions remain text-based; those apps were not captured in this update.
See sources.txt for the inspected code references and image-prompts.txt for the image-generation prompt and provenance. Keep this entire folder together when copying or sharing the guide.